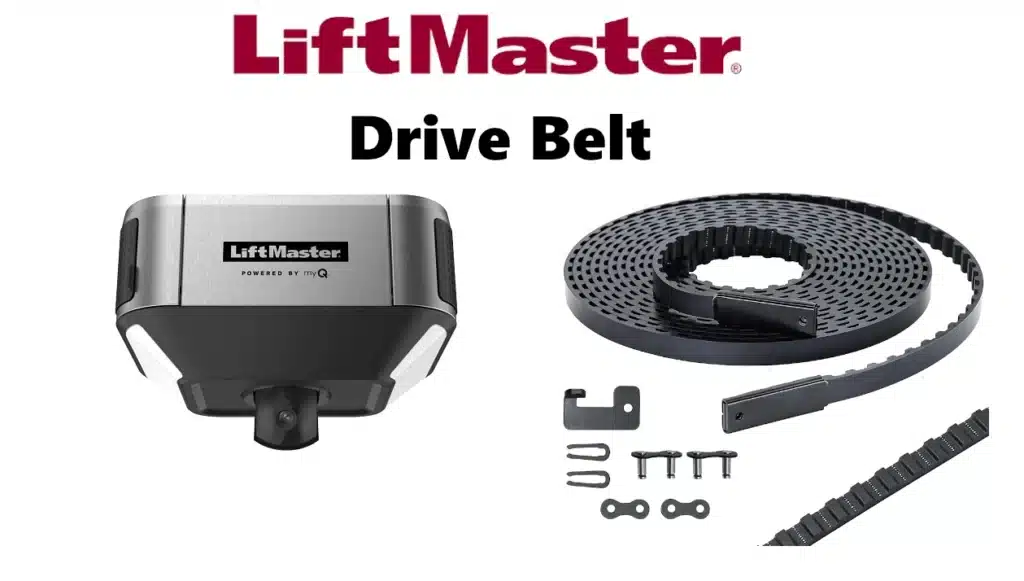
Many LiftMaster garage door openers (especially the belt-drive models) rely on a drive belt to lift and lower the garage door. The drive belt is a critical component of the opener system – essentially the equivalent of a chain on a chain-drive opener – and it provides the smooth, quiet operation belt-drive openers are known for. In this article, we’ll discuss what the drive belt is and its role, signs that it may need maintenance or replacement, typical costs involved, some DIY tips for belt care or replacement, and when to consider calling a professional.
What is the Drive Belt in a LiftMaster Opener?
The drive belt in a LiftMaster opener is a reinforced rubber belt (often with steel fibers or cords inside) that runs along the length of the opener’s rail. It connects to the trolley (the part that moves along the rail and attaches to your garage door) and loops around a pulley on the motor. When the opener operates, the motor turns the belt, which in turn moves the trolley to open or close the door. In simpler terms, the belt is what actually carries the force from the motor to the door, pulling it up or letting it down smoothly.
Belt-drive systems are prized for their quiet operation. Unlike a metal chain, the rubber belt glides with much less noise and vibration. LiftMaster’s belt-driven models are a popular choice for homes with attached garages or living space near the garage because they significantly reduce the noise of the garage door operating.
However, like any moving part under tension, the belt can wear out over time. LiftMaster belts are durable, but they are subject to stretching, fraying, or cracking after years of use (just as a car’s fan belt would be). They typically last many years under normal use, but eventually, a replacement might be needed.
Signs the Drive Belt Needs Maintenance or Replacement
It’s important to monitor the condition of your opener’s drive belt. Here are some common signs that the belt may need adjustment, maintenance, or replacement:
- Visible Wear and Tear: Inspect the belt by looking up at the opener rail. If you see the belt has frayed edges, cracks in the rubber, or missing chunks/teeth (some belts have teeth that grip the pulley), that’s a clear sign of wear. A worn belt is more likely to slip or snap. Any obvious physical damage means you should plan for a replacement soon.
- Sagging Belt or Slack: The belt should run taut along the rail. A bit of slight natural sag when the door is closed is normal, but it shouldn’t be drooping significantly. If the belt has become loose or slack, you might need to tighten it using the tension adjustment (LiftMaster openers often have a tension bolt or spring mechanism on the trolley to adjust belt tension). Over time, belts can stretch. If tightening doesn’t keep it snug or you find yourself re-tightening frequently, the belt may be stretched beyond its service limit and need replacement.
- Noisy or Jerky Operation: One of the selling points of a belt drive is quiet, smooth operation. If you suddenly notice your belt-drive opener has become noisier – perhaps you hear a slapping sound, or the door movement isn’t as smooth (jerking motions) – the belt could be slipping on the pulley due to wear or lack of tension. Sometimes a dry belt or pulley can also cause noise; a light application of a silicone-based lubricant can reduce belt noise, but do not use heavy grease or anything that might deteriorate the rubber. If noise persists, inspect the belt.
- Door Stalling or Reversing: If the opener starts to open the door and then stops or reverses, it might be because the belt is slipping under load. This could trigger the opener’s force sensor (thinking something is wrong and reversing for safety). Of course, many issues can cause a door to reverse (like bad sensors or springs), but a worn belt can be one culprit. If other components check out, consider the belt’s condition.
- It’s Been a Long Time: If your LiftMaster belt-drive opener has been running for, say, 10-15 years on the same belt with heavy daily usage, even without obvious symptoms, it’s a good idea to inspect it or have it serviced. Belts can quietly age. Some LiftMaster models might have a maintenance alert after a certain number of cycles (though usually not specifically for the belt). But as part of routine garage door tune-up, the technician would check the belt and advise if it’s near end-of-life.
How To Replace A Broken LiftMaster Garage Door Opener Belt video
Typical Costs for LiftMaster Drive Belt Replacement
The cost to maintain or replace the drive belt can vary, primarily depending on whether you do it yourself or hire a professional, and the price of the belt part itself.
- Belt Part Cost: A replacement belt for a LiftMaster opener typically costs on the order of $50 to $100 if you buy the part itself. The price depends on the model of opener and the size of your garage door (7-foot tall doors use shorter belts, 8-foot doors need a longer belt, which can cost a bit more). Generic aftermarket belts might be as low as ~$50, whereas official LiftMaster brand belts often range from around $75 up to $150 or more for certain models. For example, LiftMaster’s own parts store sells some belt kits for over $200, but those may include additional components; generally, the belt alone is much cheaper through third-party suppliers.
- Professional Replacement Cost: If you hire a garage door technician to replace the belt, you’re paying for both the belt and the labor. The average total cost for a garage door belt replacement (parts + labor) is about $240, with a typical range of about $150 to $440 in the U.S.. That range depends on local labor rates and the exact belt needed. Labor might be one hour of work. Technicians often charge a service call fee (maybe $50-$100) plus an hourly rate of $75-$150/hour. If the job is straightforward (just swapping the belt), it often takes under an hour, so you might pay something like $150-$250 total. If you have a more unusual opener or the belt failed due to another issue that needs fixing (for example, a damaged pulley or rail), costs can go up toward that higher end of the range.
- Related Parts: Sometimes when a belt is replaced, other parts might be addressed too. The trolley (carriage) that the belt pulls can wear out or break (especially if the belt was slipping). A new trolley might add $20-$50 in parts. If a pulley or sprocket was damaged by a slipping belt, that part might also be replaced. These are usually not too expensive individually, but labor might increase slightly. A reputable technician will inform you if anything else needs replacement. In general, replacing just the belt is a fairly contained job.
- DIY Savings: If you consider yourself handy, doing a belt replacement yourself can save the labor cost. You’d just purchase the belt and spend the time to install it. Belts in the $50-$80 range are common online for most LiftMaster/Chamberlain models (ensure you get the correct length and model compatibility). So your out-of-pocket could be relatively low – basically the cost of the part – if you do it on your own.
DIY Tips for LiftMaster Belt Maintenance or Replacement
Maintenance: The nice thing about belt-drive openers is that they are low-maintenance. Unlike chain drives, you don’t need to lubricate a belt (in fact, you shouldn’t – oil and rubber don’t mix). Routine maintenance for a belt drive opener is simply to check the belt tension and condition periodically. You can tighten the belt using the adjustment mechanism if it’s gotten a bit loose (consult your manual; usually it involves tightening a nut on the trolley carriage). Don’t over-tighten – the belt should have a tiny bit of slack when the door is closed (about 1/4 inch deflection when pressed at the midpoint, as a rule of thumb). Over-tensioning can put strain on the opener’s motor and other parts.
Also keep the opener’s drive pulley (on the motor) and the path the belt travels free of debris. Sometimes, for example, insulation or cobwebs in the garage might get caught around the belt or in the gears – keep it clean.
DIY Replacement: Replacing the drive belt yourself is a doable DIY project if you’re comfortable with tools and ladders. LiftMaster openers often share designs with Chamberlain and Craftsman, so there are plenty of guides and videos on how to do this. In broad strokes, the process involves: disconnecting power and detaching the door from the opener, releasing the belt tension, swapping in the new belt, then re-tensioning it and testing the door. Essentially, you’ll need to remove the old belt from the motor pulley and trolley, install the new one following the same path, and adjust the tension according to the manual. Be sure to follow your model’s specific instructions for a successful replacement.
Safety Note: Garage doors and openers have a lot of tension and force. While replacing a belt is not as dangerous as, say, replacing a torsion spring on the door, you still need to be cautious. Make sure the door is fully closed or securely propped if disengaged, so it doesn’t crash down. Keep fingers clear of pulleys and sprockets. Work with a second person if possible, or at least let someone know so they can assist if needed.
When to Call a Professional
If you’re not comfortable doing the replacement yourself or if you suspect more is wrong than just the belt, call a professional garage door technician. Here are scenarios where professional service is the best route:
- Uncertain Diagnosis: You think the belt might be the issue but you’re not entirely sure. A tech can confirm if the belt is indeed worn out or if something else (like the opener’s motor gearing or the door’s springs) is causing the problem. Sometimes people replace the belt only to find the opener still doesn’t work right because the root cause was something else – a pro can save you that headache.
- Warranty Considerations: If your LiftMaster opener is relatively new (within warranty) and the belt broke prematurely, check your warranty. LiftMaster often has a warranty that might cover the belt or at least the opener’s drive components. If so, you’ll need an authorized technician to perform the work to keep the warranty valid.
- Proper Fit and Parts: A professional will ensure the correct replacement belt is used. They have resources to quickly cross-reference the opener model to the right part number. This avoids the trial-and-error of potentially ordering the wrong belt online yourself.
- Time and Convenience: Replacing a belt might take a DIYer a couple of hours (researching, climbing up and down the ladder, etc.), whereas a trained technician might do it in 30 minutes. If you prefer to save time and avoid the hassle, it’s worth paying for the service.
- Additional Maintenance: When a technician comes to replace a belt, they’ll often lubricate the door, adjust spring tension, check the safety sensors, and ensure the opener is set properly. This full check-up can improve the overall performance and catch other issues early. For example, if the belt wore out due to an underlying issue like a misaligned track or a broken spring (which can strain the opener), the technician will spot that and recommend a fix. This holistic approach can prevent future problems.
Conclusion
The drive belt in your LiftMaster garage door opener is a key component that delivers quiet and reliable service. Paying attention to its condition – and replacing it when needed – will keep your opener running smoothly for years. If you notice signs of wear or performance issues, address them sooner rather than later: sometimes a simple tension adjustment is all that’s needed, and other times a full belt replacement is in order.
The costs for a new belt are relatively modest compared to the price of a new opener, and even hiring a pro to install it is a fairly affordable fix in the grand scheme. By either following some DIY guidance or enlisting a professional, you can ensure your LiftMaster opener’s belt-drive system remains in top shape, giving you whisper-quiet, dependable garage door operation.