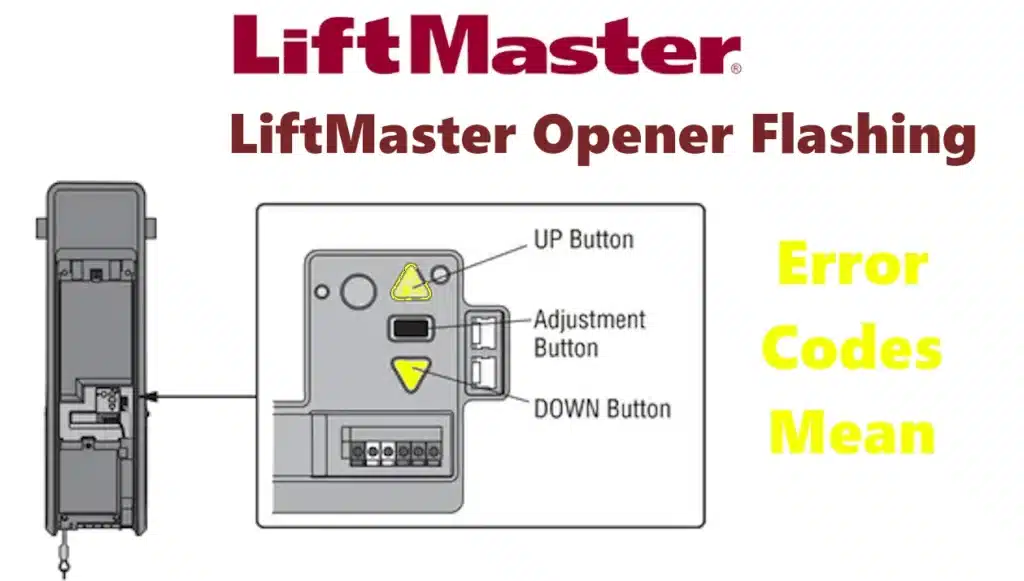
LiftMaster openers are equipped with self-diagnostic features. They will flash LED lights in certain patterns to help identify issues. On many models, the Learn button LED or the up/down arrow LEDs will blink a code. Newer openers often have two LEDs (one for UP direction, one for DOWN) that flash in a two-part code (e.g., “1-1” meaning 1 flash of the UP arrow and 1 flash of the DOWN arrow). Older models may simply flash the main light bulb a certain number of times. Use the table below to decode common LiftMaster error codes and their meanings:
Note: In the codes, the format “X-Y” means X flashes of the UP arrow (or a first LED) and Y flashes of the DOWN arrow (second LED). For example, 1-2 code means the UP indicator blinks once and the DOWN indicator blinks twice repeatedly. If your opener has a single diagnostic LED, it will blink the number of times of the combined code (some units blink a red LED in sequences). Also, the main light bulbs flashing 10 times is a specific indication of sensor issues (as noted before)
Liftmaster Garage Opener Error Codes: Causes and Repair Solutions
1-1 : Safety sensors not installed or wires disconnected.
The opener will not close the door. Check sensor wiring. Ensure both sensors are plugged into the opener’s terminal screws. Look for cut or loose wires and reconnect them. If sensors are present, this code means the opener isn’t detecting them – reattach any loose wires or replace the sensor if wiring is OK.
1-2 : Safety sensor wires shorted or reversed in connection.
Opener will not close; the opener lights flash 10 times. Inspect all sensor wiring for pinched or bared wires. Correct any miswiring (each sensor’s white-striped wire should go to the common terminal, and the solid white wires to the sensor terminal). Replace any damaged wire. Once fixed, the code should clear.
1-3 : Short circuit on door control (wall button) wires or a faulty door control.
The opener works with remotes but the wall control is unresponsive. Inspect the wall control wiring from the opener to the button. Look for staples through the wire or cuts. Disconnect the wall control wires from the opener and momentarily short the terminals with a jumper – if the door runs, the wall control or its wires are shorted. Replace the wiring or wall control panel as needed.
1-4 : Safety sensors misaligned or momentarily obstructed.
The door attempted to close but was interrupted and reversed. Realign both safety sensors until their LEDs glow steady. Make sure nothing briefly obstructs the sensors’ path (no hanging objects on the door, etc.). Once aligned, try closing the door again. This code can also appear if something passed through the beam during closing – ensure the area is clear.
1-5 : Motor circuit issue or door jammed.
This code often accompanies the door moving a few inches and stopping (or not moving at all but you hear a click). It can indicate a binding door, a bad RPM sensor, or motor overheated/failed. Manually check the door for smooth travel (no binding, broken springs, or locks engaged). If the door is free, this error could mean a serious motor or logic board fault. Try powering the opener off and on to reset. If the code persists, the motor control or RPM sensor might have failed – you may need to have the motor or control board serviced. (On certain models, code 1-5 is a “motor overheated or RPM sensor failure” alert that often requires board replacement.)
1-6 : Door coasts or reverses after stopping.
The door doesn’t stay fully open or drifts downward after opening. This indicates the opener detected unexpected movement after stopping (door balance issue). This is often a sign of an imbalanced door or the opener’s travel limit not holding. First, check door balance (with the door halfway manually, it should stay put). Then reprogram the travel limits to ensure the door fully seats at the end of travel. If the door still drifts, have a professional adjust the spring tension.
2-1 to 2-5 : General logic board or control circuit failure.
No movement or sound from the opener at all when activated. Try the simplest reset: unplug the opener for 10 seconds, then plug back in. If normal function doesn’t return, the internal logic board is likely damaged and needs replacement. (Codes 2-1 through 2-5 cover various internal faults – but all generally point to replacing the receiver/logic board if power cycling doesn’t help.)
3-2 : Travel module failure.
The opener cannot set or recall its travel limits properly. The travel module (limit switch assembly or travel sensor) might be defective or disconnected. Check that the travel module is mounted correctly and its wire harness is secure. You can try reprogramming the travel limits from scratch. If reprogram fails or the code persists, replace the travel module sensor.
3-3 : Battery backup circuit error.
(If applicable) The battery charging circuit on the board has an error – often indicated by the battery LED flashing green constantly. For openers with battery backup, this means the charger on the board isn’t functioning. Try a unit reset (power cycle). If the battery LED still flashes green and 3-3 code shows, the logic board likely needs replacement to fix the charging circuit. The door will continue to operate, but the battery may not charge.
4-1, 4-2, 4-3, 4-4 : Excessive force or resistance detected (during closing or opening).
The opener is working too hard to move the door, triggering the force safety system. Often the door will reverse to open position mid-travel. Inspect the door for any obstructions or binding that would cause high force. Check the springs and hardware – a broken spring or tight track can increase force. Also verify the door isn’t hitting something (or the travel limits aren’t set past the floor or header). After addressing mechanical issues, reprogram the force settings and travel limits. Essentially, 4-1 to 4-4 codes mean the opener thinks the door is too hard to move – eliminate causes of friction and adjust settings. If the error persists with a properly moving door, the opener’s force sensor might be out of calibration or faulty.
4-5 : Travel module communication error.
The opener lost communication with the travel module (limit sensor). Check the wiring connection between the travel module and the logic board – it may be a plug or small wire harness. If it’s loose, re-seat it. If damaged, replace the wiring. Often, this code follows after a 1-5 or other error when the travel limits are in question. Reprogramming the travel limits can sometimes clear 4-5. If not, you likely need to replace the travel module itself.
4-6 : Safety sensors were obstructed while closing (or sensor circuit on long close command).
Essentially, the door was told to close while a sensor issue (1-1 or 1-2) existed. The opener lights flash and door won’t close. This is a specific variant of the sensor problem. It means the door tried to close when the sensor beam was broken. Re-check alignment of the safety sensors and ensure nothing is interrupting the beam. Once the sensors show solid lights, reset the opener (if needed) by unplugging for a few seconds, then try again. The code should clear when the sensors are functioning and the door closes normally.
Common LiftMaster Diagnostic Codes, their meanings, and recommended solutions. Refer to your model’s manual for any additional codes not listed here. Not all openers use all of these codes, but this covers the most frequently encountered diagnostics on residential LiftMaster openers.