Programming your LiftMaster garage door opener to work with your car’s built-in remote buttons can greatly streamline your daily routine. Many cars come equipped with either HomeLink or Car2U systems that can be trained to operate garage doors, eliminating the need for a separate clicker remote. In this guide, we will provide a detailed step-by-step process to program your LiftMaster opener to your car, along with troubleshooting tips in case you run into difficulties.
For most modern vehicles, the process is straightforward, especially if your car uses the popular HomeLink system. Let’s assume HomeLink for the primary steps (since it’s the most common), and we’ll note any special considerations, including LiftMaster’s rolling code technology and compatibility issues.
Preparation Steps
Before you begin, make sure you have:
- Your LiftMaster remote control (the handheld transmitter that currently opens your garage door).
- A ladder or step stool to reach the Learn button on your LiftMaster opener motor unit.
- Your car parked close to the garage (just outside, facing the door is ideal) with the ignition on or in accessory mode (some vehicles require the ignition to be on for programming HomeLink).
It also helps to have a second person if possible: one can press the opener’s learn button while the other stays in the car to press the buttons, though this can be done by one person by moving back and forth.
Tip: For best results, put a fresh battery in the handheld remote. A weak remote battery can cause programming failures.
How To Program LiftMaster Openers with HomeLink ?
Follow these steps to program your car’s HomeLink buttons to your LiftMaster opener:
- Clear Existing Codes (if necessary): If your car’s HomeLink system has been programmed before and you want to start fresh, you can reset it. This is usually done by holding the two outer HomeLink buttons down until the indicator light begins to flash rapidly (after about 10 seconds). This step will erase any old codes in the HomeLink system. (Note: If your HomeLink is brand new or not previously programmed, you can skip clearing it.)
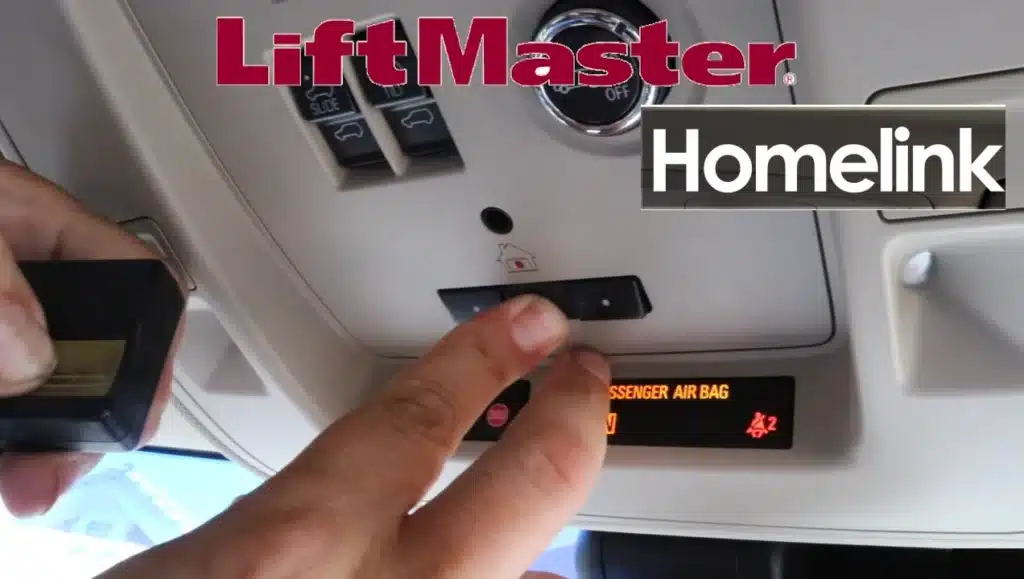
- Train HomeLink with the Handheld Remote: Choose which HomeLink button in your car you want to use for the garage door (often there are three buttons). Hold your LiftMaster remote a couple of inches away from the HomeLink panel in your car. Simultaneously press and hold the HomeLink button and the LiftMaster remote button (the one you use to open the door). Continue holding both buttons. The HomeLink indicator light will typically start by blinking slowly and then change either to a fast blink or go solid – this indicates that the HomeLink has learned the remote’s code. This may take 10-30 seconds. When the HomeLink light changes (either to solid or rapid blink), you can release both buttons. At this point, your car has learned the frequency/code from your handheld remote. Note: Some vehicles might beep or have a message indicating success as well.
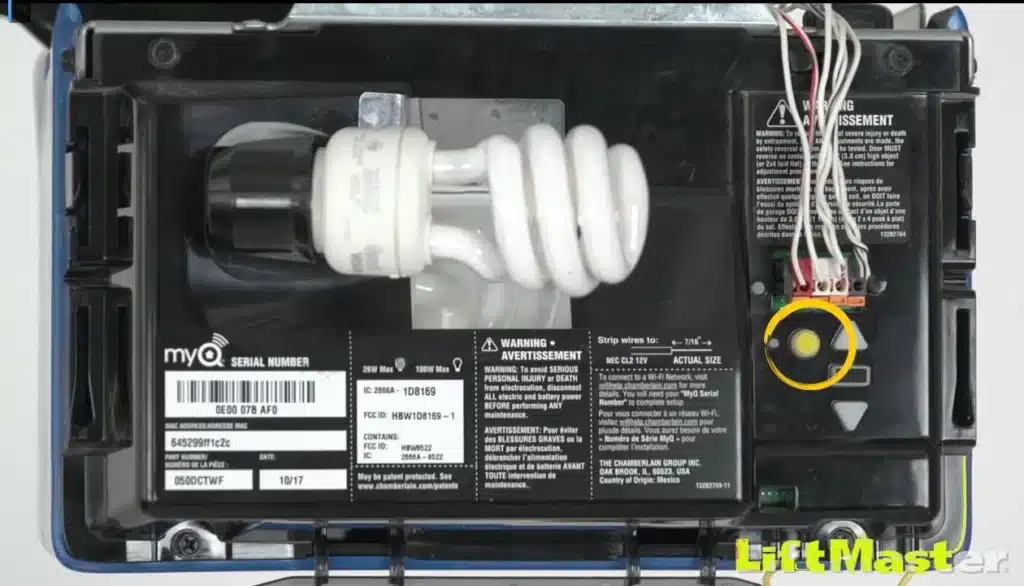
- Program the Opener (Using Learn Button): Now you need to teach the garage door opener to recognize your car’s HomeLink (which is now transmitting the code you taught it). Climb up to your LiftMaster motor unit and locate the Learn (or “Learn/Program”) button. It’s usually on the back or side of the motor unit, often near where the antenna wire hangs down. It might be under a small cover. It could be colored (often yellow, purple, red/orange, or green depending on the model/era). Press and release the Learn button. You will see an LED next to it light up or start blinking, indicating that the unit is in learning mode. You now have about 30 seconds to perform the next step.
- Teach the Opener to Your Car’s Signal: Within the 30-second window after pressing the Learn button, go back to your car and press and hold the HomeLink button that you programmed in step 2 for a couple of seconds, then release. Press the HomeLink button again (some instructions say to do this up to 2-3 times). The idea is to send the code from your car to the opener while the opener is in learn mode. If successful, the opener’s light may flash and you might hear a click. On certain LiftMaster models, the opener’s LED will blink once to indicate it learned a new remote. Some cars also provide a confirmation, like the HomeLink light changing color or flashing rapidly. After this, exit learn mode by doing nothing – it will time out in a few seconds.
- Test the HomeLink: Moment of truth – press the HomeLink button in your car (with the car ignition on, and garage door closed). The garage door should respond, just as it would with your LiftMaster remote. If the door opens or closes, congratulations! Your car is now programmed to the opener.
Most late-model cars and LiftMaster openers will follow the above steps. Essentially, it’s a two-stage process: (a) teach car from the remote, (b) teach opener from the car (rolling code synchronization).
Can’t Get Your Car to Work with LiftMaster? Here’s What to Check
If programming didn’t work, here are some troubleshooting ideas:
- Repeat the Process: Sometimes it doesn’t take on the first try. Reset and try the steps again, making sure you follow the timing closely. After pressing the opener’s Learn button, you may need to press the car’s button multiple times. On some vehicles, you might just press and hold for the entire time; on others, you press-hold-release-press again. Consult your car’s manual’s specific HomeLink instructions if unsure – the general process is the same, but the exact indication of success can vary by vehicle.
- Compatibility Issues (HomeLink Repeater): If your door still won’t program, and especially if your car is an older model (older HomeLink versions pre-2010s) and your LiftMaster opener is very new (built in the last few years), you might have a compatibility issue. LiftMaster introduced a newer Security+ 2.0 rolling code system around 2011 that operates on a different frequency. HomeLink versions prior to about 2012 might not communicate with Security+ 2.0 without a special bridge device. LiftMaster acknowledges that some vehicles require a Compatibility Bridge to work with their latest openers.
- Signs of this incompatibility are: the HomeLink light never goes solid during step 2, or the programming all seemed to go fine but the door won’t respond at all in the end. The solution is to get a HomeLink Compatibility Bridge kit (available from LiftMaster/Chamberlain). This kit comes with a repeater that plugs into an outlet in your garage and a new remote. You program the repeater with your opener and then your car to the repeater – effectively bridging the gap. If you suspect this, check your car’s model year against HomeLink’s compatibility list (HomeLink’s website or LiftMaster’s compatibility tool). Many post-2012 cars are fine, but vehicles older than that may need the bridge if you have a brand-new LiftMaster opener with Security+ 2.0 (yellow learn button).
- Car2U System Differences: A few vehicle makes (some Ford, Lincoln, etc.) use a Lear Car2U system instead of HomeLink. The programming concept is similar but the steps differ slightly (usually involving a different method to put the car’s system in learn mode and an indicator that blinks in three phases). If your car has Car2U (the buttons usually have numbers 1-2-3 on them), consult that car manual. You will still use the LiftMaster’s Learn button as part of the process for rolling code openers. In some cases, Car2U requires you to press the in-car button a certain number of times to cycle through programming modes. The key takeaway is that the LiftMaster opener can still be programmed to a Car2U system; just follow the vehicle-specific instructions.
- Distance or Timing Issues: If the door didn’t respond in step 5, it could be that you took too long between pressing the Learn button and sending the signal from the car, causing the timer to expire. Or maybe the car was too far from the opener during programming. Try to have the car as close as possible (outside the garage door) and be ready to press the HomeLink button as soon as you hit the Learn button. Having a second person helps reduce delay.
- Existing Remotes Still Work: Don’t worry, programming your car does not erase your other remotes. The LiftMaster opener can remember multiple remotes (typically 8-12 remote devices). So your original handheld remotes and any keypad will continue to function. If for some reason nothing works after attempted programming, you might have inadvertently cleared the opener’s memory (this would only happen if you held the learn button down for too long, which clears all codes). If that occurred, you’d need to reprogram your remotes again. But a simple press-and-release of Learn as instructed above should only add the new device, not remove others.
- Confirm HomeLink is Active: Some vehicles require an extra step to “activate” HomeLink (for instance, a fuse might need to be installed or a setting enabled, though this is rare). This would be in your vehicle’s manual. If the HomeLink indicator light never comes on at all when you press the buttons, there might be an issue with the car’s system (fuse, etc.).
By troubleshooting in this way, you should be able to get your car and LiftMaster opener working together. If you’ve tried everything and it still won’t program, you can contact a local LiftMaster dealer or the car dealership for assistance – but usually it’s something that can be solved with the above steps.
Conclusion
Programming a LiftMaster garage door opener to a car’s built-in remote (HomeLink or similar) is a handy capability that most homeowners can do on their own. The key steps are to first train the car with your existing remote and then train the opener to recognize the car – a process designed to maintain security through rolling codes. Always refer to your vehicle’s owner manual for any make/model specific instructions, but for most cases, the guidelines above apply. With a bit of patience, you’ll soon be able to press a button in your car and watch your LiftMaster garage door opener smoothly open your garage, without needing to fumble with a separate remote control.