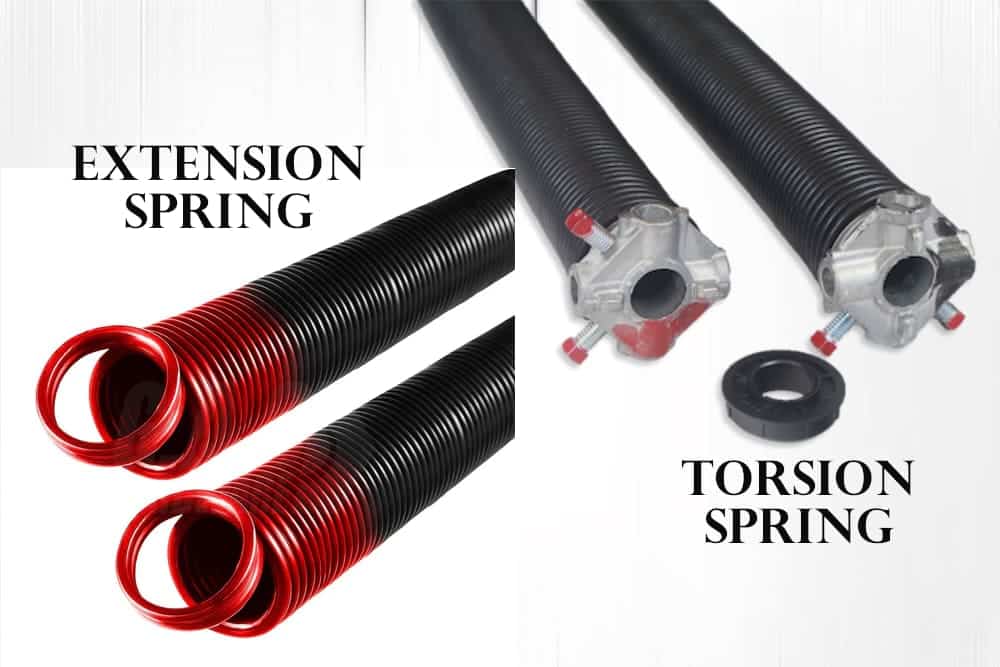
Replacing a garage door’s torsion springs is extremely dangerous because these springs are under intense torque. They sit on a metal shaft above the door and counterbalance the door’s weight. Improper handling can lead to severe injury or property damage. In fact, more than 2,000 garage-door related injuries occur each year – many due to springs.
This guide will walk homeowners through the safe procedure for unwinding a broken torsion spring and winding a new one. However, if you lack experience with high-tension springs, we strongly recommend hiring a professional to do the job. For a complete overview of all spring types and repair costs, visit our comprehensive Garage Door Spring Repair Pillar Guide.
1. Essential Tools: The Winding Bar Rule
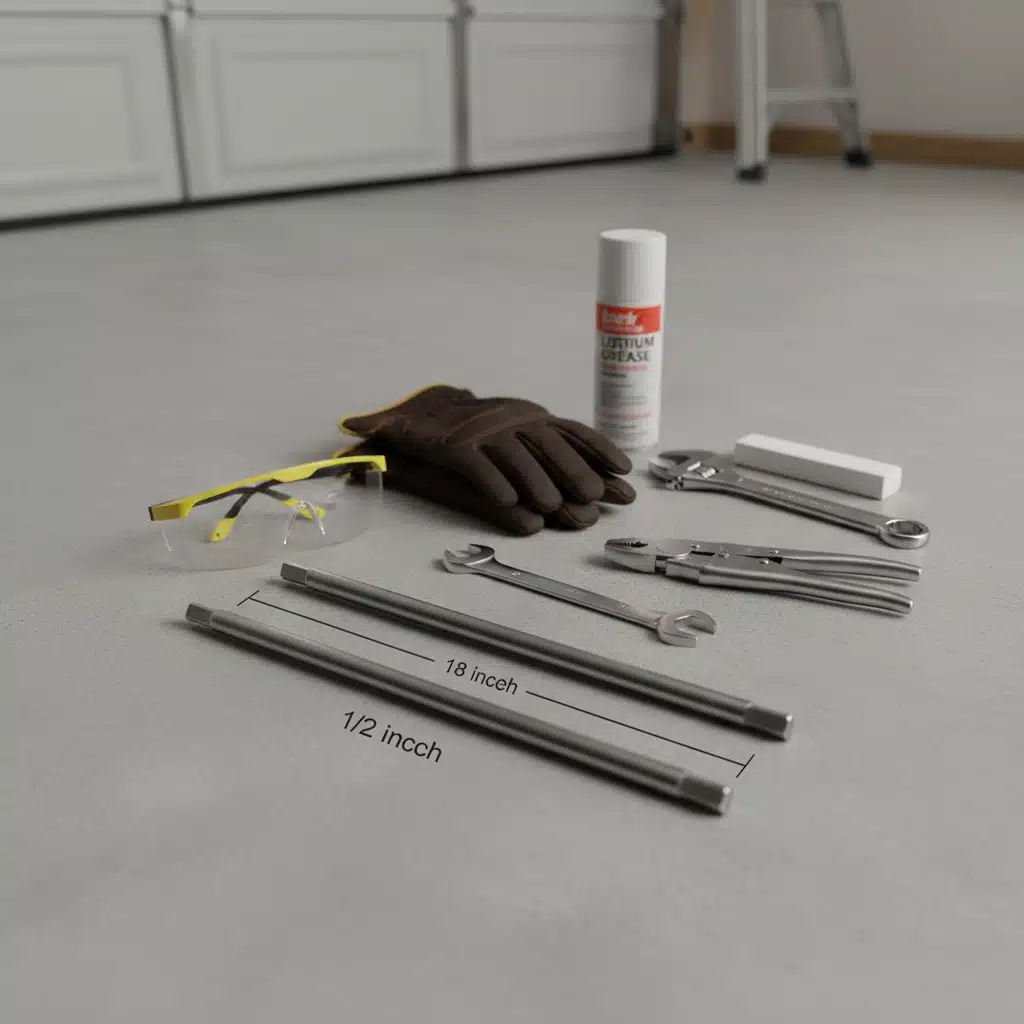
- No substitutes for proper winding bars: First, utilize solid steel winding bars that suit your spring’s winding cone (usually 1/2″ diameter, ~18″ length). Never use screwdrivers, pliers, rebar, or other homemade tools to wound or unwind a torsion spring; they can slip out of the cone and become missiles. Proper winding rods have sharp, 90° ends that fit perfectly in cone holes. At most hardware stores, 36″ steel rods can be cut in half to create two 18″ bars.
- Safety Gear: Wear impact-resistant safety glasses or a face shield (springs can snap and throw debris) and strong leather gloves to avoid sharp edges. Keep loose clothing and hair held back and wear robust sleeves since springs and cones can injure you. To protect your feet, use boots or hard-toed shoes and use a stable ladder with rubber feet..
- In addition: to the new torsion spring(s), gather a wrench for the set screws (an open-end or tiny adjustable wrench is best) and one or two locking pliers. The vise-grips will clamp the torsion shaft and prevent movement. Remember to bring a garage door lubricant and a marker or chalk for spring marking.
2. The “Line of Fire” Safety Protocol
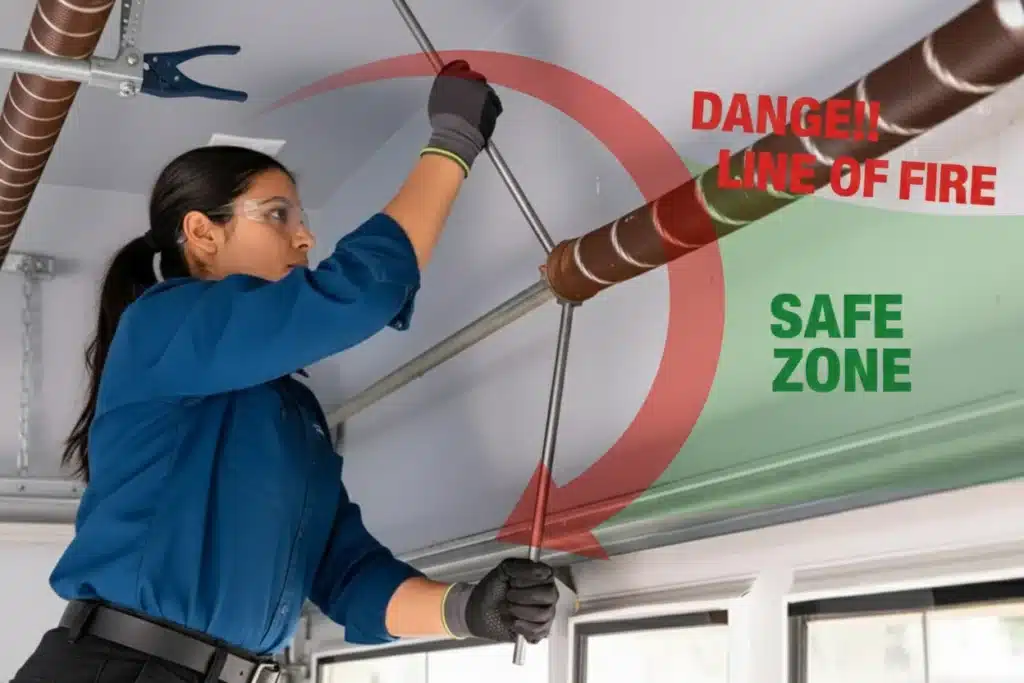
Working with a wound torsion spring is like handling a loaded weapon – you must never put your body in the spring’s line of fire. These safety steps are crucial before touching any tension:
- Body Positioning: Always stand to the side of the winding bars and spring, never directly in front of them. This way, if a bar slips or the spring violently unwinds, it will whip past you instead of into you. Keep your head out of the path of the winding cone and bars at all times. In practice, this means your face and torso should be offset to the side of the spring (not inline with the bar’s arc).
- Clear the Path: Remove any obstacles or clutter around you. You need an unobstructed escape path in case you have to quickly step back. No part of your body (especially your face, chest, or hands) should ever be directly in front of the spring or cone during winding/unwinding. By keeping to the side, if the cone were to slip or a spring were to break, the energy will release in a path that misses your vital areas.
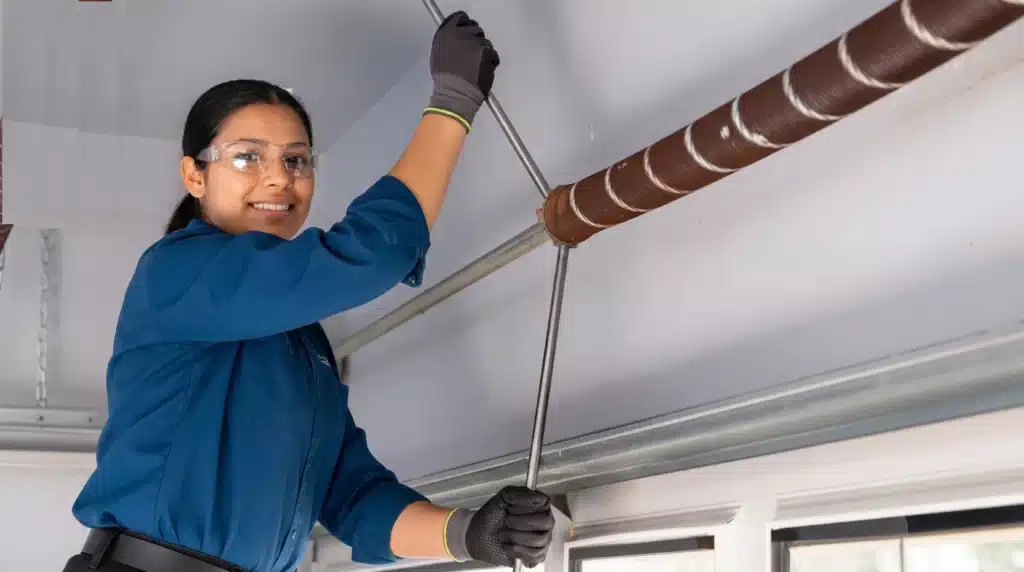
- Secure the Shaft: Before loosening anything, lock down the torsion shaft to prevent it from spinning unexpectedly. Take a pair of locking pliers (vise-grips) and clamp them tightly onto the shaft just outside the spring’s winding cone. Brace the handle of the vise-grip against the wall or door header. This will hold the shaft in place and stop it from twisting when tension is released. Professionals always secure the tube like this to avoid the shaft rotating and whipping cables or bars around. For extra caution, you can even put a second vise-grip on the other end of the shaft near the cable drum.
With these precautions in place – proper bars, safety gear, side positioning, and a secured shaft – you are ready to begin the unwinding procedure. Double-check that the garage door is still closed and that your ladder is solid. Now proceed slowly and deliberately through the following steps to safely de-tension (unwind) the spring.
3. The Unwinding Process (Safe De-tensioning)
Now comes the most dangerous part: unwinding the old torsion spring to remove all its tension. Move slowly and keep a firm grip on the bars at all times. Here is the step-by-step unwinding method:
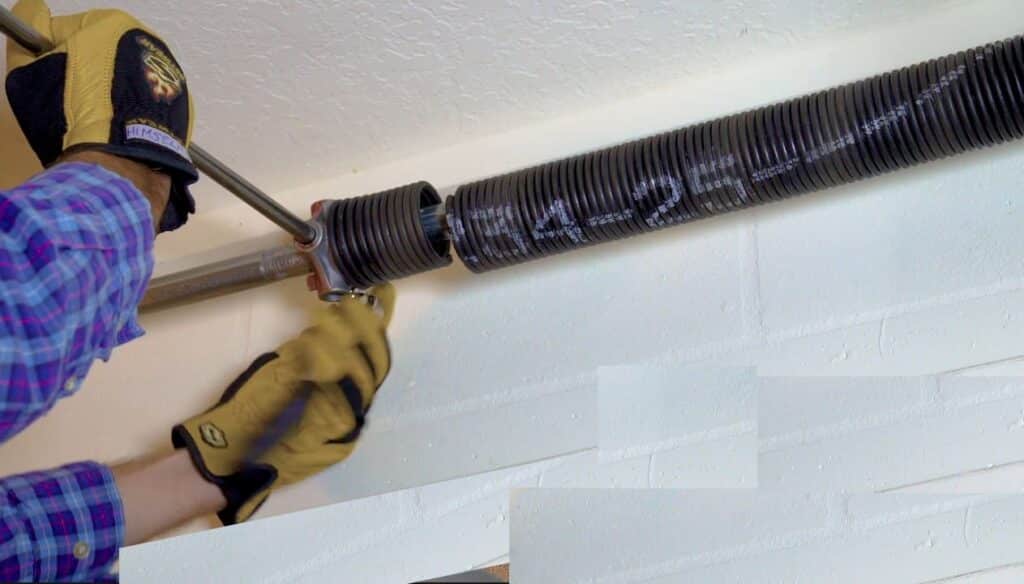
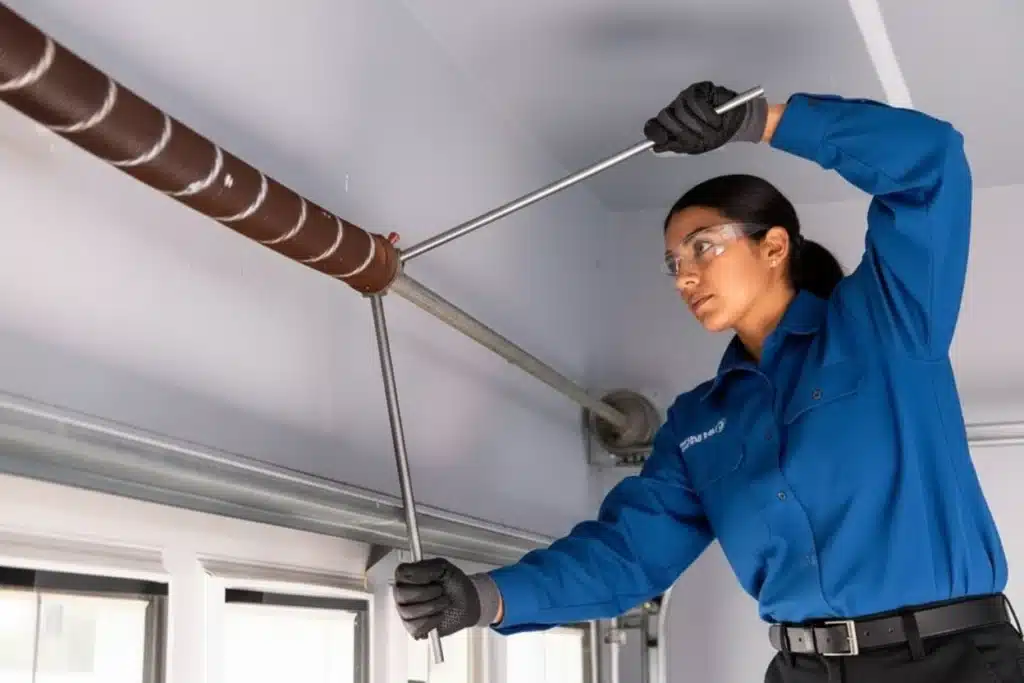
- Insert the First Winding Bar: Climb the ladder to one side of the spring. Fully put your first winding bar into a spring winding cone hole. It should go in until it strikes the cone’s core (you may hear a “click”). To avoid suddenly releasing the spring’s load, never unscrew the set screws without a snug-fitting bar in the cone. DIYers often wind themselves in the ER for this blunder. Secure the bar and situate yourself safely to the side.
- Loosen the Set Screws Carefully: While holding the winding bar tightly, slowly remove the two set screws on the winding cone (typically square or hex-head screws that attach the cone to the shaft). In case the cone slips, use an open-ended or tiny adjustable wrench instead of a lengthy ratchet. Slowly loosen each set screw, alternating between them, until they are off the shaft. As soon as you loosen the set screws, the spring tension will pass to the winding bar. Hold that bar while loosening screws. Allow the spring to turn the bar; regulate the descent but don’t force it up. In case the bar jolts, stay clear. Set screws that are properly fastened may loosen in less than one turn. If the cone won’t budge after both screws are released, it may be trapped on a rusty or warped shaft. If so, tap the cone or bar with a hammer to loosen it while bracing.
- “Leapfrog” the Winding Bars to Unwind: Unwind the spring quarter-turn by quarter-turn after loosening the set screws. Slowly press the first bar down 90 degrees (one quarter turn) to release tension as the spring expands. Always use a second winding bar to support the load before removing it. Make sure your second winding bar is in the next hole at the top of the winding cone before the first bar reaches vertical. Hold the second bar tightly, then remove the first from the bottom hole. Let the spring unwind by carefully lowering the second bar. As you spin one bar downward, the other bar above takes the spring’s weight, letting you unwind gradually. Keep one bar in the cone! The spring is torqued during quarter-turn releases.
- Repeat Until All Tension Is Released: Continue this alternating dance with the two bars: lower one, put the other at the top, remove one, lower the other, etc. Spring unwinds with each quarter-turn. Be mindful of quarter-turns (or just relax). The process will repeat numerous times because most garage door torsion springs have dozens of quarter-turns of stress when fully wound. As tension decreases, the spring will lengthen and require less power, but be careful—a slip can whip a bar even near the end. Continue until the winding cone can revolve freely and the spring is relaxed with the coils stretched, allowing the bars to turn easily. Remove the bars from the cone after unwinding. The old spring may be safely removed from the middle bracket and shaft. Rewind the second torsion spring if your door has two.
With the old spring(s) safely de-tensioned and removed, you can install the new spring on the shaft (ensuring the correct left/right wind orientation for each side). Secure the cones on the shaft, and make sure cables are properly on the drums. The next phase is to wind the new spring to the specified tension.
4. Winding the New Spring: The Math
Installing the new torsion spring essentially means winding it up to the correct tension that balances your garage door. This must be done carefully and accurately. Here are key guidelines for winding the spring the proper amount:
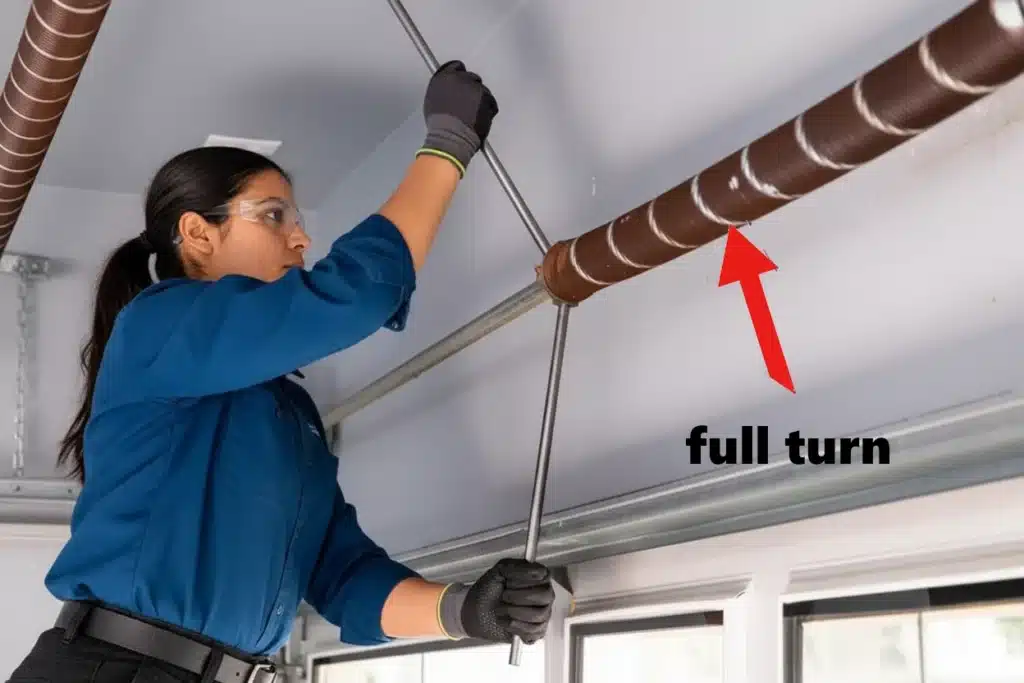
- Quarter-Turn Increments: Torsion springs are always wound in quarter-turns of the winding bars. Each full revolution of the spring equals 4 quarter-turns with the bars. By adding tension one quarter-turn at a time, you maintain control and can count how many turns you’ve applied. Always wind or unwind in small quarter-turn steps, never all at once. This methodical approach ensures even, precise tensioning and makes it easy to track your progress.
- Rule of Thumb – One Turn per Foot of Door: The amount of winding (number of turns) needed depends on your door’s height and weight. A common rule of thumb is about 1 full turn per 1 foot of door height, plus an extra fraction of a turn. For example, a standard 7-foot tall garage door typically requires roughly 7.5 to 8 full turns of tension on each spring (that’s about 30–32 quarter-turns). This guideline helps get you in the right range. In practice, lighter one-car garage doors may be fine at the lower end (7.5 turns), whereas heavier insulated or two-car doors might need closer to 8 or a bit more. Always consult your spring manufacturer’s instructions or a tension chart for your specific spring model if available. The goal is to wind the spring enough that the door is balanced (see Section 5), but not so much that it’s “over-wound” and overstressing the door or opener.
- Mark the Spring to Count Turns: Before you start winding, take a moment to mark the new spring for easy turn counting. Draw a straight line down the length of the spring with white paint, chalk, or a bright marker (a “winding stripe”). This line should run across all coils in a straight line when the spring is relaxed. As you wind the spring, the line will twist into a spiral. Each time the painted stripe wraps around and realigns, you’ve added one full turn. This visual aid lets you verify the number of turns at a glance. It’s an old installer trick that significantly reduces the chance of miscounting. If your spring already has a factory winding stripe, use that. Otherwise, a quick paint or chalk line can save you a lot of hassle and ensure accuracy.
When you’re ready to wind: make sure the door is still closed and secure, and that the new spring is installed with its cone tightened on the shaft (but with its winding cone set screws temporarily loose so it can turn). Follow the same safety steps as unwinding – stand to the side, wear your gear, keep the shaft locked with vise grips – and simply reverse the process: use your winding bars to rotate the cone and add tension quarter-turn by quarter-turn.
Typically, you’ll position a bar in the cone pointing downward and push upward (for the correct direction, note that springs on one side wind clockwise, the other counter-clockwise – winding is always in the direction that makes the spring coil tighter). Count your turns using the mark on the spring.
For instance, a 7′ door spring you might wind ~30–32 quarter-turns as noted. Do not exceed the recommended turns! Over-winding can cause the spring to bind or could even cause it to break. Wind until the calculated number of turns is reached, or until the coils of the spring just begin to overlap tightly (a sign it’s fully wound).
Once the new spring is appropriately wound, carefully tighten the set screws on its winding cone to lock it to the shaft.
5. Balancing and Finishing
With the spring(s) now wound, the hard part is over – but you’re not quite done. This final section covers how to secure everything, test the door’s balance, and perform finishing touches to ensure a safe, smooth-operating door:
- Set Screws – Tighten Securely but Don’t Over-Tighten: After winding to the correct tension, you must tighten the winding cone’s set screws to clamp the spring onto the torsion shaft. Use your wrench to turn each set screw in until it just firmly contacts the shaft, then give it an extra 1/4 to 1/2 turn to seat it. The screws need to bite into the metal shaft to hold against the torque. Do NOT crank the set screws too hard – over-tightening can crush or deform the hollow torsion tube or strip out the threads. A damaged shaft will cause you big problems later (like the spring slipping or difficulty removing it in the future). So, make it tight enough to hold, but not so tight that you’re indenting the shaft. (If your shaft is solid steel, you can tighten a bit more than with a hollow tube, but in general, less is more once the screw is gripping.)
- Perform a Balance Test: Reconnect the garage door from the opener (lift the opener arm back onto the trolley or re-engage the release). Now test the door’s balance before powering the opener. Manually lift the door about halfway (waist height) and gently let go. A properly balanced door should stay in place at roughly mid-open position without drifting up or slamming down. If the door creeps downward, the spring tension is slightly too low (the door is too heavy) – you may need to add a quarter-turn or two of tension. If the door tends to fly upward or won’t stay down, the spring is over-tensioned – you may need to carefully unwind a quarter-turn. Adjust in small increments and re-test until the door is balancing on its own. This balance test is critical: the door’s weight should be fully supported by the springs at every position. When balanced, the door will also reduce strain on your garage door opener.
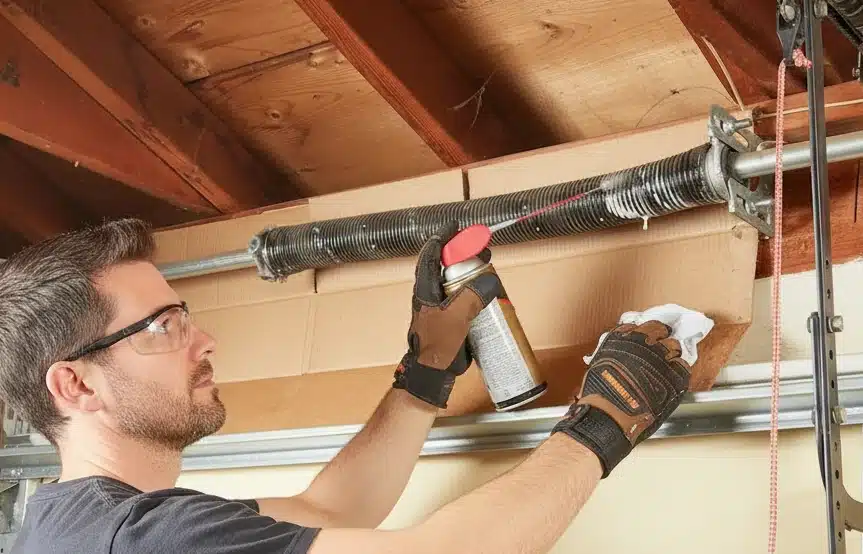
- Lubricate the Spring Coils: Finally, as a preventive maintenance step, apply a garage door lubricant along the length of the torsion spring. Use a spray lithium-based grease or a silicone spray designed for garage doors (do not use WD-40 or heavy engine grease). A light coat on the coils will reduce friction and help prevent the spring from binding or making loud “spring chatter” noises during operation. Lubricating the springs (as well as hinges and rollers) promotes smoother, quieter movement and extends the life of the spring by reducing wear. Wipe off any excess drip, and you’re done!
Pro Tip: If you aren’t sure which product to choose, check out our expert review of the 10 Best Garage Door Lubricants to find the perfect match for your springs and climate.
As a finishing checklist, remove all tools from the work area and double-check that all hardware is tightened (e.g. end cable drums, center bearing plate, anchor bracket bolts). Carefully test the automatic opener: reconnect power and run the door up and down a few times, listening for any unusual sounds. The door should open and close smoothly. If it jerks or the balance seems off, stop and address those issues (you might need a slight tension tweak or to check cable alignment).
Congratulations – you have safely replaced your torsion spring. By following the above steps methodically, you avoided the major hazards and ensured your garage door is balanced and secure. Remember, torsion springs should last many years when properly installed. For safety, it’s wise to periodically inspect the springs and hardware, keep them lubricated, and only perform adjustments with the correct tools and precautions.
If any aspect of this process felt uncertain or unsafe, do not hesitate to call a professional – safety always comes first when dealing with high-tension springs. For expert assistance, you can easily find a garage door spring repair professional near you to ensure the job is handled with the highest level of precision and care.