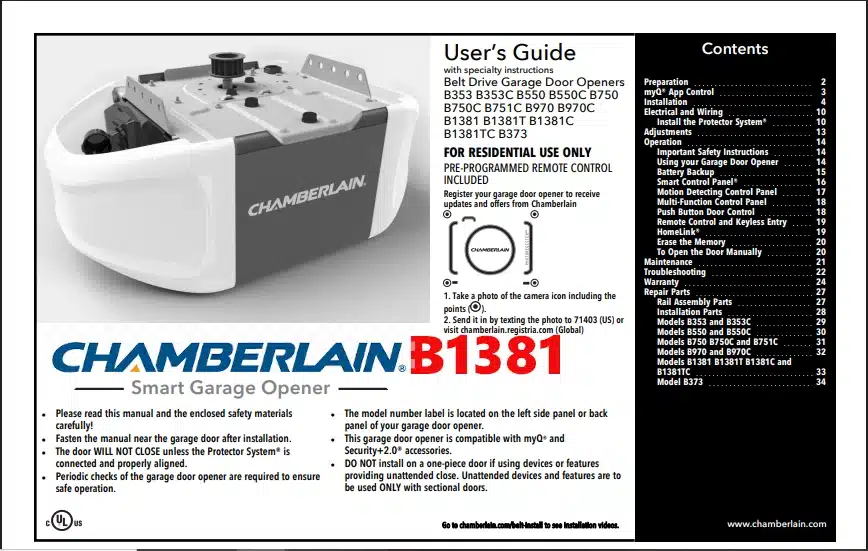
Welcome to the comprehensive summary of the Chamberlain garage door opener owner’s manual for the B1381 model. This guide distills the key points from the manual, covering everything from product features to installation, programming, operation, maintenance, troubleshooting, and warranty details. Whether you’re setting up your new opener or need a refresher on its operation, this article provides clear instructions and tips in an easy-to-read format.
Chamberlain Garage Door Opener Owner’s Manual – B1381 model Overview
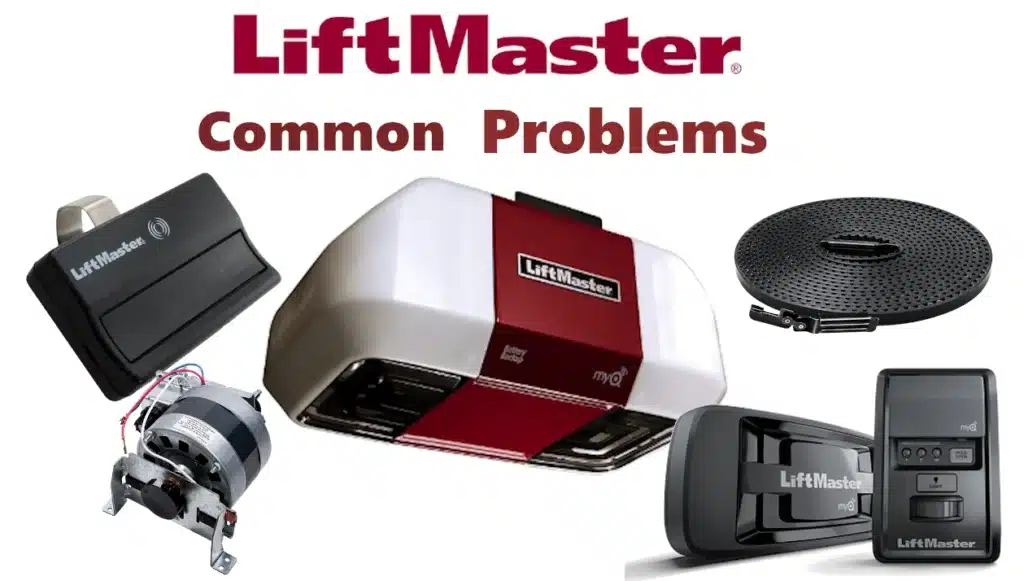
The Chamberlain B1381 is a premium belt-drive garage door opener designed for residential use. It offers a quiet yet powerful operation with a durable belt drive mechanism, ideal for garages near living spaces. Key features of this model include:
- Integrated Wi-Fi (myQ® Connectivity): The opener is myQ-enabled, allowing you to connect it to your home Wi-Fi and control/monitor your garage door via a smartphone app. (It is compatible with myQ® smart accessories and Security+2.0® remote controls.)
- Battery Backup: Models like the B1381 come with a battery backup system, enabling the garage door opener to function during power outages. When running on battery power, the opener operates at a slower speed and emits a beep roughly every 2 seconds to indicate it’s in backup mode.
- Ultra-Bright LED Lighting: Uniquely, the B1381 features 100 integrated LED lights that provide daylight-quality illumination in your garage. This long-lasting LED lighting means you won’t need to change bulbs, and it brightly lights up all corners of the garage.
- Safety & Security: Like all Chamberlain openers, the B1381 includes the Protector System® safety sensors. The door will NOT close if the safety sensors are misaligned or obstructed, per the owner’s manual. These photo-eye sensors, installed at the base of the door tracks, detect people or objects in the door’s path and automatically reverse the door if interrupted. The opener also uses secure rolling code technology (Security+ 2.0) to prevent unauthorized access.
- Accessories: The B1381 typically comes with a multi-function wall control panel and pre-programmed remote control(s) included from the factory. The remote is ready to use out-of-box, and additional accessories (like wireless keypads or extra remotes) can be added if needed. The wall control allows you to operate the door from inside the garage and provides additional features (light control, lock mode, etc., described later).
With these features, the Chamberlain B1381 Smart Garage Opener is built for convenience, safety, and reliable performance. Next, we’ll summarize the installation process as outlined in the Chamberlain garage door opener owner’s manual.
Chamberlain Garage Door Opener Owner’s Manual – Installation Guide For B1381
Proper installation is critical for safe and efficient operation of your Chamberlain B1381 garage door opener. The owner’s manual provides detailed step-by-step instructions. Below is an overview of the main installation steps and tips:
Preparation and Safety: Before you begin, ensure your garage door is balanced and in good working condition. Install the opener only on a properly balanced, lubricated door – an unbalanced door can be dangerous and may prevent the opener from reversing correctly. Disable any door locks and remove ropes, and keep children and pets away from the work area. Do not plug in the opener until instructed. Have a sturdy ladder and the necessary tools ready. Always follow all safety guidelines (wearing safety glasses, etc.).
Installation Steps:
- Assemble the Opener and Rail: Follow the instructions to assemble the belt rail and attach it to the motor unit on the floor. The belt drive and trolley should be installed according to the manual’s directions (usually, the rail comes in sections that need to be bolted together, then the belt is threaded with proper tension). Make sure the belt is routed correctly over the pulley and around the sprocket on the power unit, and that the emergency release cord is attached to the trolley.
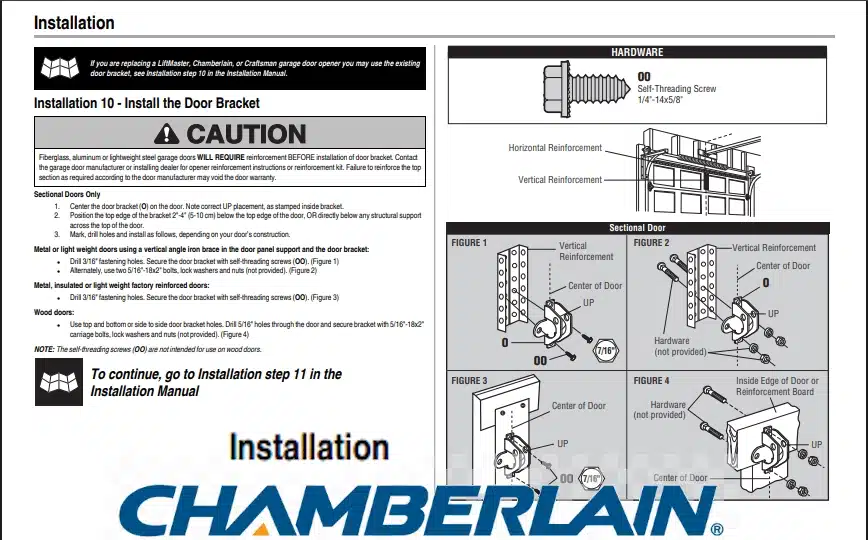
- Install the Header Bracket: Locate the header bracket on the wall above the garage door. Close the garage door and mark the vertical centerline of the door on the header wall (the area above the door opening). Mount the header bracket to a structural support on this line, typically about 2–4 inches above the highest point of the door’s travel for sectional doors. If there isn’t enough space on the wall (or an obstruction like a torsion spring), the manual allows mounting the header bracket on the ceiling (within 6 inches of the header wall). Use the proper fasteners (lag screws into wood studs or concrete anchors into masonry) and ensure the bracket is rigidly fastened, since it will bear the pull of the opener. Tip: Do not install the header bracket over drywall; always fasten it to a solid structural support.
- Attach the Rail to the Header Bracket: Once the header bracket is in place, lift the assembled rail and opener motor unit. Attach the front end of the rail to the header bracket using the clevis pin and fastener as directed. The rail should pivot on the bracket. At this point, support the opener unit (e.g., on a ladder) while you prepare to mount it to the ceiling.
- Mount the Opener to the Ceiling: Position the opener’s motor unit near the ceiling in line with the header bracket and the garage door’s centerline. The owner’s manual suggests installing the power unit at least 7 feet above the floor, if possible. Secure the opener to the ceiling joists using the hanging brackets and hardware provided. Typically, metal perforated angle iron is used to hang the opener: attach one end to the opener’s mounting brackets and the other end to the ceiling joists with lag screws. Ensure the opener is level and aligned with the door; a slight angle can cause issues. Use diagonal bracing if needed to eliminate any sway. Double-check that all mounting is solid since the unit will vibrate slightly during operation.
- Install the Door Bracket and Door Arm: Attach the door bracket to the top of your garage door. For sectional doors, center the door bracket (usually a sturdy brace) on the top panel of the door, about 2–4 inches below the top edge of the door (or below any structural stiffener across the top). Secure it with the appropriate screws/bolts as indicated (lightweight doors may require through-bolting or a reinforcement bracket). Once the bracket is in place, connect the curved door arm to the trolley (which slides along the rail) and the straight door arm to the door bracket. Then join the two arms together with bolts and nuts. The manual provides diagrams for how the straight and curved arms should be connected at a correct angle for smooth door travel. Make sure the door is in manual release mode (trolley disconnected) when attaching arms, and that the door is closed. After connecting, pull the emergency release cord toward the opener to re-engage the trolley, so the door is reconnected for testing.
- Install the Safety Sensors (Protector System®): The Chamberlain B1381 uses infrared safety reversing sensors that must be installed on each side of the garage door. Mount each sensor on the provided bracket just inside the door tracks, no more than 6 inches above the floor on each side. The sensors should face each other directly across the garage opening, with no obstruction. Run the sensor wires up the wall and along the ceiling (or through the wall if pre-wired) to the opener unit. Secure the wires with staples or cable clips, avoiding piercing the insulation. Connect the sensor wires to the opener’s screw terminals or quick-connect plugs as indicated (usually, one wire from each sensor to the white terminal, and the other wire from each to the gray terminal). Align the sensors so that their indicator LEDs are glowing steady (one sensor will show a green LED and the other an amber LED when properly aligned). If the LEDs are off or flickering, adjust the sensor brackets until the beam is properly aligned. Remember, the door will not close if these sensors are not connected and aligned.
- Wiring the Wall Control: Install the multi-function wall control panel (door control) inside the garage, typically by the access door at about 5 feet off the ground (out of reach of children). Run the two-strand bell wire from the wall control to the opener (if not pre-wired in your garage). Connect the wires to the designated terminals on the opener (usually red and white terminals). Ensure the wire is stapled up neatly and not shorting. Mount the wall control to the wall with screws. Important: The wall control should be in sight of the door and away from any moving parts for safety.
- Electrical Connection: Once all components are mounted and wired, plug in the garage door opener to a proper outlet (if the outlet is far, Chamberlain suggests installing an outlet within 3 feet of the opener; do not use extension cords). The opener’s lights should come on, and you may hear a beep if the battery backup is present. Ensure the Wi-Fi LED (if any) is noted for setup (we will cover programming Wi-Fi in the next section).
- Programming Travel Limits and Force: With installation hardware done, follow the manual’s instructions to set the travel limits (how far the door goes up and down) and the force settings. On modern Chamberlain openers like the B1381, this is done using the UP and DOWN adjustment buttons on the opener unit or via the control panel menu. Typically, you will press and hold the UP button until the door reaches your desired fully-open position, then set it, and do similar for the down position. The opener will automatically adjust force after you set the travel limits, but you should still test and fine-tune if necessary. The travel limits tell the opener when to stop moving the door in each direction. The manual also notes that the force is self-learned by the electronic controls based on the weight of the door during programming. Consult the owner’s manual “Adjustments” section for detailed steps on using the Adjustment Buttons or menus to program these limits.
- Safety Reversal Test: After installation and programming, test the safety reversal system to make sure the door will reverse if it hits an obstruction. Place a solid object about 1½ inches high (like a 2×4 board laid flat) on the garage floor in the door’s path. Close the door using the opener – when the door contacts the object, it must stop and reverse off of it within about 2 seconds. If it does not, or if it pushes too hard before reversing, adjust the down travel limit or force and test again. Also test the photo-eye sensors by starting to close the door and waving an object through the beam – the door should reverse immediately and the opener lights will flash. Never use the opener if the safety systems are not functioning correctly.
Following these steps from the Chamberlain garage door opener owner’s manual will ensure your B1381 model is installed correctly. Always refer to the manual for any special instructions (for example, one-piece door installations have additional brackets and instructions). Chamberlain also offers installation videos on their website for visual guidance.
Chamberlain Garage Door Opener Owner’s Manual – Programming Instructions
Once your opener is installed, the next step is programming its features such as Wi-Fi connectivity, remote controls, and keyless entry. The Chamberlain garage door opener owner’s manual provides guidance on each of these programming tasks. Below, we break down the programming process for smartphone connectivity and for remote/keypad pairing.
Chamberlain Garage Door Opener Owner’s Manual – Wi-Fi and myQ Setup
One of the standout features of the B1381 opener is built-in Wi-Fi connectivity for use with the myQ® smartphone app. Connecting your opener to your home network allows you to monitor and control the garage door from anywhere. Follow these steps for Wi-Fi setup as outlined in the manual:
- Ensure Wi-Fi Signal in Garage: Make sure you have a 2.4 GHz Wi-Fi signal (802.11 b/g/n) that reaches your garage. The manual suggests standing near the opener with your smartphone to check signal strength. If the Wi-Fi signal is weak or not detectable in the garage, you may need to move your router closer or use a Wi-Fi range extender. A strong, reliable signal is important for the myQ features to work properly.
- Gather Network Info: You will need your home network’s Wi-Fi name and password (use the main network, not a guest network) and the myQ serial number of your opener (found on the opener or in the manual on page 2). Have this information handy before starting the setup.
- Download the myQ App: On your smartphone or tablet, download the Chamberlain myQ app (available for iOS and Android). Create a myQ account if you don’t have one, and follow the in-app prompts to begin adding a new device.
- Put Opener in Wi-Fi Learn Mode: The B1381 opener has an LED indicator for Wi-Fi. To connect, you’ll need to activate the opener’s Wi-Fi learn mode. Typically, this is done by pressing a specific button sequence on the opener (for example, a Learn button or the Wi-Fi button if present). Check the manual for the exact method – on many models, after power-up, the unit might automatically broadcast a Wi-Fi signal (blinking blue LED) waiting for setup. If not, you may have to press and hold the yellow Learn button until the blue Wi-Fi LED begins blinking. Note: The manual mentions that after initial installation or a power outage, the opener must complete a full open/close cycle before you can activate Wi-Fi learning mode. So if your opener isn’t entering pairing mode, run the door up and down once and try again.
- Connect via the App: In the myQ app, follow the steps to add a device. Typically, you will connect your phone to the opener’s temporary Wi-Fi signal (the app will guide you to go to your phone’s Wi-Fi settings and select the network name like “MYQ-XXXX” broadcast by the opener). Once connected, the app will ask for your home Wi-Fi credentials and send them to the opener. The LED on the opener will change color to indicate status: blinking blue means in learn mode, solid blue means your phone is connected to the opener, blinking green means attempting to connect to your router, and solid green means Wi-Fi setup is complete and the opener is online. When you see a solid green LED, your opener is successfully connected to the internet.
- Finalize Setup: The app will let you name your garage door (e.g., “Home Garage”) and test control. Once done, you should be able to open/close your garage via the app, get alerts, set schedules, and receive firmware updates for the opener. Remember that myQ remote features will not work when the opener is running on battery backup power during an outage – this is a safety measure and to conserve battery.
If you need to reconfigure the Wi-Fi or change networks in the future, the manual provides instructions (typically, erasing the Wi-Fi settings can be done via a certain button sequence or via the app, and then you can set it up again). For troubleshooting connectivity or if the LED indicators differ, consult the Wi-Fi troubleshooting section in the manual or visit Chamberlain’s support site.
Chamberlain Garage Door Opener Owner’s Manual – Remote and Keypad Programming
The B1381 model comes with at least one remote control pre-programmed to the opener from the factory. This means after installation, you should be able to press the button on the included remote and it will operate the door immediately. However, if you have additional remote controls or a wireless keyless entry keypad to program, or if you need to reprogram your remote, the owner’s manual covers a few simple methods to do so:
- Programming a Remote using the Learn Button: The classic way to add a new remote is by using the Learn button on the garage door opener unit. Locate the Learn button on your opener (for Chamberlain models this is usually a yellow or purple square button on the back or side of the motor unit). To program:
- Press and release the Learn button on the opener. A small LED next to it will light or start blinking, indicating that the unit is in learning mode.
- Within 30 seconds, press the button on the remote control that you want to program to the opener. You may have to hold it for a second. The opener lights should blink or you might hear a click to confirm that the remote was successfully programmed.
- Test the remote by pressing the button again – the door should activate. Repeat for any additional remotes. Note: If programming fails, clear the opener’s memory (hold the Learn button until LED goes out) and try again, or try a different method below.
- Programming via the Wall Control (Motion-Detecting or Smart Control Panel): If your system includes a multi-function wall control panel with a digital menu (e.g., the Smart Control Panel® or a motion-detecting control panel), you can program accessories through the menu. For example, on a Smart Control Panel, you would press the “Menu” button, navigate to “Program” then select “Remote” or “Keypad” on the screen. The panel will prompt you through steps. Generally, it will instruct: press the remote button you want to program, and it will display a success message when learned. Using the wall control’s program menu can be convenient since it gives confirmation on the LCD screen. For a basic door control without a screen, some have a “Learn” button on the control that serves the same function (pressing it puts the opener in programming mode, then press remote). Always consult the specific instructions for your type of wall control in the manual.
- Programming a Keyless Entry (Wireless Keypad): To add a Chamberlain wireless keypad, you usually use a similar process. One method: put the opener in learn mode (press Learn button once) then within 30 seconds, on the keypad enter a 4-digit PIN of your choice and press the Enter key. The opener lights should blink to confirm it learned the keypad. Another method if using a Smart Control Panel: go to “Program” > “Keypad” in the menu, then it might ask you to enter a PIN on the keypad and press Enter, etc. Once programmed, you can mount the wireless keypad outside your garage door for convenient keyless access.
- Clearing Codes: If you ever need to erase all remote control and keypad codes from the opener (for example, you lost a remote and want to ensure it no longer works), you can press and hold the Learn button on the opener for about 6–10 seconds until the Learn LED turns off. This wipes all remote and myQ device pairings. You will then have to reprogram any remote or keypad you still use. The manual suggests doing this if you move into a home with an existing opener – clear the old codes and program your own remotes.
According to the Chamberlain garage door opener owner’s manual, the remote and keypad programming process is user-friendly, and most Chamberlain remotes are compatible across Security+2.0 models. Just remember that the B1381’s remote is likely already programmed, so additional programming is only needed for extra accessories. If a remote will not program or activate the door, consult the troubleshooting section of the manual – for instance, ensure the Lock feature isn’t enabled on your wall console (which can disable remote inputs). We’ll cover more on troubleshooting in a later section.