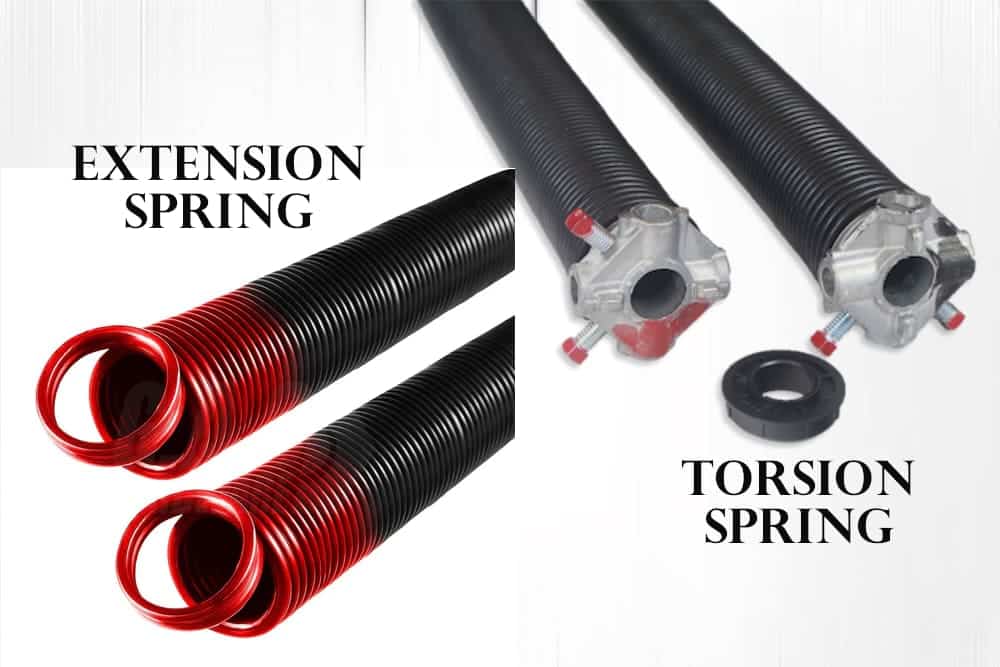
A balanced garage door should lift easily and stay in place when you stop it at waist level. When a door suddenly feels heavy to lift, flies open on its own or hangs unevenly, the problem is often the torsion springs. These tightly wound coils, mounted on a metal shaft above the door, counterbalance the door’s weight. Over time springs lose tension and must be rewound to restore balance. To ensure longevity during this process, maintaining the metal’s health is key; you can see our expert review of the 10 best garage door lubricants to prevent friction during adjustments. This guide explains when adjustments are necessary and how to re-tension torsion springs safely.
Always use the proper tools and call a professional if you are unsure; torsion springs are under high torque and mishandling them can cause serious injury.
Part 1: When to Adjust or Re‑wind (The “Why”)
Knowing the signs of poor spring tension can prevent damage to the door or opener. The following indicators suggest it’s time to adjust the springs:
- Door feels heavy or difficult to lift: If you disconnect the opener and the door requires a lot of effort to raise or will not stay open halfway, the springs may be under‑tensioned. Adding tension with a few quarter‑turns helps the door support its own weight.
- Door flies up or “runs hot”: Springs that are too tight cause the door to shoot upward rapidly. Garage‑door experts call this a “hot” spring. Over‑tensioned springs can momentarily slacken cables as the door passes over the header. Reducing tension prevents slack cables and keeps the door from hitting its stops too hard.
- Uneven movement or sagging: A door that opens crookedly, binds in the tracks, or sags on one side often indicates one spring has lost tension. Adjust both springs equally to keep the door level.
- Visible gaps or stretched coils: Gaps in the coil mean the spring has failed. Broken springs cannot be repaired. In this case, professional standards dictate that you should replace both garage door springs at the same time to maintain a synchronized cycle life.
- Slack cables at the drums: Slack cables often result from springs that are too weak or too strong. When the springs are overly tight (running hot), momentary slack occurs as the door goes above the header; too weak and the door drifts, causing cables to unravel. Proper tension keeps cables taut.
- After new installation or door modifications: When installing a new spring or after adding insulation or windows, ensure the springs are wound to match the door’s weight. Most 7 ft doors need about seven and a half to eight full turns (approximately 30–32 quarter‑turns). Heavier doors may require slightly more.
- Seasonal temperature changes: Cold weather can stiffen metal parts and alter spring tension. If the door that was balanced in summer suddenly feels heavy in winter, a quarter‑turn adjustment may correct it.
Ignoring these symptoms puts strain on the opener and can cause cables to throw off the drums or the door to slam shut. Inspect your springs regularly and address small imbalances early.
Part 2: Essential Tools (The “How” Prep)
Working on torsion springs requires the right equipment. Improvisation with screwdrivers or pliers is dangerous and often ends in injury. Assemble these tools before beginning:
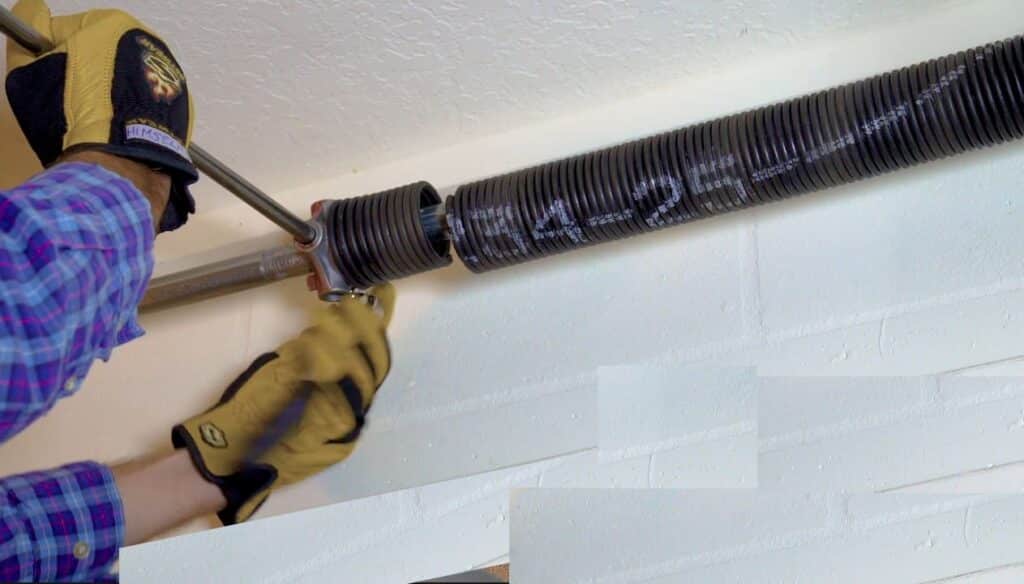
- Hardened steel winding bars: Use two solid steel bars sized for your winding cone (typically 1/2 inch diameter and about 18 inches long). Winding bars have square, sharp ends that fully seat in the cone’s holes. Do not use screwdrivers or rebar; they can slip and become projectiles.
- Vice grips or locking pliers: Clamp a pair of vice grips onto the torsion shaft against the wall or header. This locks the shaft and prevents it from spinning unexpectedly during adjustments.
- Wrenches: A 7/16‑ or 1/2‑inch wrench fits most set screws on winding cones. A socket set or open‑end wrench works fine; avoid long ratchets that could be yanked by the spring.
- Safety gear: Wear impact‑resistant goggles or a face shield and thick leather gloves. Secure loose clothing and tie back long hair.
- Ladder and clamps: Use a stable ladder and clamp the door’s tracks just below the bottom rollers to keep the door from moving while you work.
- Marker or chalk: Mark the spring’s starting position and the shaft just outside the winding cone. A painted stripe on the coils turns into a spiral as you wind, making it easy to count turns.
Gathering these items and preparing the work area will make the winding process smoother and safer.
Part 3: The Adjustment Process (Key Steps)
Follow these steps carefully to adjust torsion springs. If your door uses two springs, adjust both equally to keep forces balanced.
- Safety lock and preparation: Close the garage door fully and disconnect the opener from power. Clamp locking pliers onto the track below the bottom rollers so the door cannot move. Attach another pair of vice grips to the torsion shaft to prevent it from turning.
- Mark positions: Use chalk or tape to mark the current position of the winding cone and the shaft. Draw a line down the length of the spring to track turns.
- Insert the first winding bar: Stand to the side of the spring (never in front of it). Insert a winding bar fully into one hole of the winding cone. Keep a firm grip on the bar before touching the set screws.
- Loosen the set screws: While holding the bar, loosen the two set screws on the winding cone with your wrench. Loosen a bit at a time; as soon as the screws release the cone, the spring’s tension transfers to your bar. Hold the bar firmly to control the load.
- “Leapfrog” the bars in quarter‑turn increments: With the first bar inserted, gently raise or lower it 90 degrees—this is one quarter‑turn. Insert the second winding bar into the next hole before removing the first to maintain control. Continue alternating bars, counting each quarter‑turn as you add or reduce tension. A 7 ft door generally needs about 30 quarter‑turns; an 8 ft door uses roughly 34. Increase tension by raising the bar (turning the cone upward toward the ceiling); reduce tension by lowering the bar (turning downward).
- Tighten the set screws: After achieving the desired tension, tighten the set screws until they contact the shaft, then give each screw an additional 1/4 to 1/2 turn. Do not over‑tighten; crushing the shaft can lead to failure.
- Test door balance: Remove the clamps and vice grips. Reconnect the opener and test the door manually. Lift the door halfway; it should stay in place. If it drops, add a quarter‑turn. If it rises, remove a quarter‑turn. Repeat until the door remains steady.
These steps apply to most standard lift torsion systems. For extension springs, tension is adjusted by relocating the hook in the track hanger—closer to the door for more tension and farther for less. When in doubt, contact a professional.
Part 4: The Math – Turns vs. Door Height
The amount of tension needed depends on your door’s height, weight and drum size. Professionals calculate the exact number of turns using formulas, but homeowners can use guidelines:
- Rule of thumb: One full turn for every foot of door height. This converts to four quarter‑turns per foot. For example, a 7 ft door requires roughly 7.5–8 full turns, or 30–32 quarter‑turns. Heavier insulated doors may need an extra half turn, while lighter wooden doors may need slightly less.
- Formula based on drum circumference: On standard 4 inch cable drums, the number of turns equals the door height in inches divided by the drum circumference (≈12.57 inches) plus one. For a 7 ft (84 in) door: (84 ÷ 12.57) + 1 ≈ 7.67 turns (7 1/2 turns). For an 8 ft door: (96 ÷ 12.57) + 1 ≈ 8.6 turns (8 1/2 turns).
- Manufacturer charts: Many spring suppliers publish winding charts. Upstate Doors suggests about 26 quarter‑turns for a 6 ft door, 30 for a 7 ft door, 34 for an 8 ft door and 38–40 for a 9 ft door. Always consult the specific chart for your door weight and spring wire size to avoid over‑ or under‑tensioning.
Below is a concise reference table:
| Door height (ft) | Approx. full turns | Approx. quarter‑turns* |
|---|---|---|
| 6 ft | ~6.5 – 7 | 26–28 |
| 7 ft | 7.5 – 8 | 30–32 |
| 8 ft | 8.5 – 9 | 34–36 |
| 9 ft | 9.5 – 10 | 38–40 |
*Numbers are per spring on a two‑spring system and may vary with door weight. Always adjust both springs equally.
These guidelines help you get close to the correct tension. After winding the calculated turns, perform the balance test and adjust by quarter‑turns until the door stays mid‑way.
Part 5: Critical Warnings and Safety Tips
Torsion spring adjustments are hazardous. Observe the following precautions:
- Identify wind direction: Torsion springs are wound opposite each other. From inside the garage looking out, the spring on the right side of the center bracket is left‑wound, while the left spring is right‑wound. At the cone, a left‑wind spring’s end points left; a right‑wind spring’s end points right. Installing springs on the wrong sides or winding in the wrong direction causes the spring to loosen from the cone and can ruin the spring.
- Space and cone position: The stationary cones should sit flush against the center bearing plate. Finger‑tighten the bolts; overtightening can crack the cone. If wider bearings prevent the cones from seating fully, install washers between the cone and bracket. Mark the shaft just beyond the winding cone; the spring should lengthen by roughly one coil per full turn. If it does not grow in length, you are winding the wrong direction.
- Always keep a bar in the cone: Never remove a winding bar until the second bar is inserted. Professionals tape the bars at the insertion point to ensure they are fully seated. A bar that slips can whip violently and cause injury.
- Avoid over‑ or under‑tensioning: Springs that are too tight (“hot”) cause the door to rocket upward and create slack cables. Springs that are too weak (“dead”) make the door heavy and can cause cables to unwind. Always test the door’s balance after each adjustment and add or subtract tension a quarter‑turn at a time.
- Use proper tools: Only winding bars made for torsion springs should be used. Screwdrivers and pliers can slip and are not designed for this application. Wear safety goggles and gloves, secure loose clothing and keep bystanders away while working.
- Know when to stop: If the door still feels heavy after several adjustments, if you see rust or gaps in the spring, or if you hear a loud bang, stop. Broken or severely worn springs require replacement by a professional. More than 2,000 garage‑door injuries occur each year; many involve springs. Safety should always take precedence over saving money.
Conclusion
Torsion springs are engineered to counterbalance your garage door for tens of thousands of cycles. Recognizing signs of imbalance and performing careful quarter-turn adjustments can prolong the life of your entire system. However, due to the extreme tension involved, safety should always take precedence over saving money.
If you aren’t comfortable handling high-torque hardware or don’t have the specialized tools, don’t take the risk. You can easily find a professional garage door repair near you to ensure your springs are adjusted with precision and safety.