Garage door extension springs are hardworking components that make a heavy door feel light. When they break or lose tension, many people assume it’s a quick DIY fix, but the reality is more complex. Extension springs store a great deal of energy and are connected to pulleys, cables and safety devices. Mishandling them can result in serious injury or damage to the opener. This article walks through the science behind extension springs and explains how to replace them and adjust the cable system safely.
Before beginning any repair, we recommend consulting our Ultimate Guide to Garage Door Springs, which provides a complete overview of system types, component identification, and professional safety standards.
The guidance is based on technical manuals and expert advice from reputable sources in 2025 and is presented for educational purposes. Because these procedures involve high tension, minors should never perform them alone—always work with a trained adult or call a professional.
Pre-Repair Checklist: Tools & Safety Gear
Before you begin, ensure you have the following items ready to perform the replacement safely:
- Two C-Clamps or Locking Pliers: To secure the door in the open position.
- Socket Wrench Set & Open-end Wrenches: To loosen and tighten brackets.
- Step Ladder: To reach the horizontal tracks safely.
- Safety Glasses & Heavy-duty Gloves: Essential for protection against sharp metal or sudden snaps.
- A Helper: At least two people are required to lift the door manually.
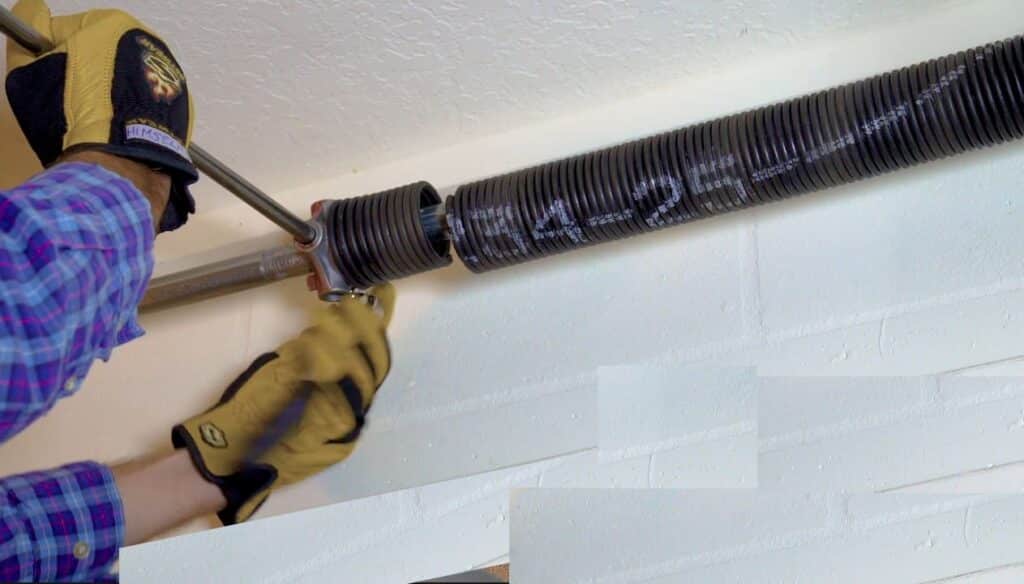
1 – The “Open Door” Safety Rule

The golden rule for extension springs is simple: release the energy before you start. Because these springs stretch as the door closes, they are under maximum tension when the door is down. To work safely, the door must be fully raised so the springs can contract and lose their tension.
Expert Safety Protocol:
- Support the Weight: At least two people should lift the door, as it will be extremely heavy without spring assistance.
- Secure the Tracks: Follow instructions from leaders like Heritage Garage Door and Holmes: raise the door fully and lock it in place using C-clamps or locking pliers on the tracks, positioned just below the bottom rollers.
- Disconnect Power: Unplug the opener to prevent accidental activation during the repair.
Why it matters: Working on a closed door is a major hazard. If a spring or cable snaps under tension, the door can crash down or tools can become dangerous projectiles. Never rely on the opener motor to hold the door up—only physical clamps on the tracks provide the security needed to handle high-tension hardware safely.
Watch this expert demonstration on how to safely secure your door and identify extension spring components before you begin:
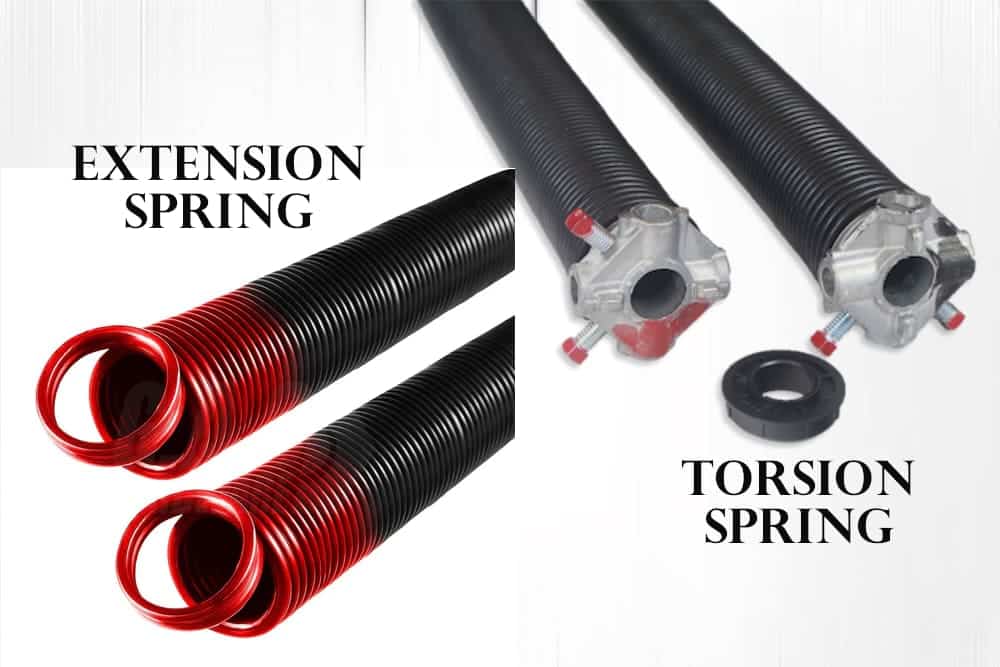
2 – Color‑Coding Identification
In the United States, most extension springs are color‑coded at their ends to correspond to the door weight they are designed to lift. This system helps technicians and homeowners quickly identify the correct spring. The Door & Access Systems Manufacturers Association (DASMA) technical data sheet lists standardized colors for different weight ranges. For example, gold bands indicate springs for roughly 80 lb doors, light blue corresponds to 90 lb doors, tan to 100 lb, white to 110 lb, green to 120 lb, yellow to 130 lb and so on.
Express Garage Doors provides a similar chart that associates colors with weight ranges—blue for 40 lb/140 lb/240 lb doors, red for 50 lb/150 lb/250 lb, brown for 60 lb/160 lb/260 lb, orange for 70 lb/170 lb/270 lb and continuing up the spectrum. Some doors use two springs on each side; the Holmes manual notes that if your door uses four large extension springs, you should use one of each color on either side so that the spring tension is equal.
Below is a sample table summarizing color codes. Always confirm your specific door’s requirements using manufacturer charts or by weighing the door. Tables should not replace professional verification, but they provide a quick reference for common sizes.
| Spring color | Typical door weight (lbs) | Notes |
|---|---|---|
| Gold | 80 lb, 180 lb, 280 lb | Used for mid‑weight doors |
| Light blue | 90 lb, 190 lb, 290 lb | Check the weight to confirm |
| Tan | 100 lb, 200 lb, 300 lb | Often used on 8‑ or 9‑foot single doors |
| White | 110 lb, 210 lb, 310 lb | Heavier single doors |
| Green | 120 lb, 220 lb, 320 lb | Heavy doors, sometimes insulated |
| Yellow | 130 lb, 230 lb, 330 lb | Heavier double doors or high‑insulation doors |
Why matching the color matters
Springs must be sized for the door’s weight and height. Hunter Door warns that the spring size needs to match the garage system’s function and that installing an incorrect spring can cause serious damage to the door or the opener. If the replacement spring is too light, the door becomes heavy; the opener motor and gears will strain and overheat. If it is too strong, the door may fly open or fail to close properly. To avoid this, match the color on your old spring or weigh the door using a scale and consult manufacturer charts.
When in doubt, take the old spring to a professional for measurement. Some doors may have faded markings or custom springs; in such cases, a qualified technician should determine the correct size.
Step‑by‑step identification
- Identify the spring type. Extension springs run along the horizontal tracks; torsion springs sit above the door on a metal shaft. Ensure you are working on extension springs before using a color chart.
- Locate the color band or painted end. The color is usually on the hooked ends of the spring. If the paint has faded, measure the spring length, wire diameter and inside diameter and weigh the door to select a replacement.
- Verify with door weight. Use a bathroom scale under one side of the door (with springs disengaged) to measure its weight. Compare the measurement with the manufacturer’s color code chart.
- Use identical pairs. When a door has two springs per side, ensure both springs have the same color. The Holmes manual emphasizes using one of each color on opposite sides for four‑spring setups so that tension is equal.
3 – Mandatory Safety Cables

Extension springs can be unpredictable. When they break, the tightly coiled steel can unravel at high speed, whipping across the garage. A properly installed safety cable threads through the center of each spring and anchors to the track bracket. If the spring snaps, the cable keeps it from flying off and causing injury or property damage. Meadows Garage Doors explains that the safety cable’s main job is to catch the spring if it breaks and that without one, a snapped spring can shoot across the garage, posing a serious risk. The same article recommends threading the new cable through the spring, securing it to the bracket and double‑checking that both sides are installed correctly.
Holmes’ manual states plainly that extension spring doors must never be operated without a properly installed spring containment cable and provides detailed instructions for installing the cable: tie one end of the 1/8‑inch containment cable to the rear track hangers, thread it through the center of the spring and secure the other end to the horizontal angle.
Signs you need a safety cable
- Missing or frayed cables: If you inspect your springs and do not see a cable running through them or notice frayed wires, install new safety cables immediately.
- Older doors: Doors older than ten years often lack safety cables or have weakened hardware. Meadows Garage Doors notes that worn‑out springs can fail without warning, making safety cables even more critical.
- Multiple springs: When a door uses multiple extension springs, install a cable through each one. If your door has four springs, the Holmes manual instructs connecting the upper containment cable to an angle clip on the jamb.
Installing or replacing safety cables
- Prepare the workspace: Open the door fully, unplug the opener and clamp the door securely as described in Section 1. Wear protective equipment.
- Remove tension: Loosen the spring to relieve any remaining tension. Many extension springs use S‑hooks at the rear hanger; carefully unhook the spring while keeping the cable threaded through it.
- Thread the new cable: Feed the cable through the spring from the end near the hanger. Meadows advises ensuring the cable runs straight and does not twist.
- Secure both ends: Attach one end of the cable to the spring bracket or rear hanger and the other end to the horizontal track angle using an appropriate bolt or S‑hook. Holmes warns not to over‑tighten—there should be a little slack so the cable can catch the spring when it breaks.
- Double‑check installation: Verify that the cable cannot rub against the spring or hang too loosely and that all brackets and bolts are secure. Repeat on the other side.
Using proper steel cables designed for garage doors is essential; never substitute with rope, string or thin wire. Worn pulleys, sharp edges and corrosion can abrade safety cables over time, so inspect them at least twice a year.
4 – Pulley & Sheave Inspection

The cable and pulley system is as important as the springs. Each extension spring connects to a pulley (also called a sheave) that redirects the cable up to the drum above the door. When pulleys wear out, they wobble, causing the cable to fray and eventually snap. Heritage Garage Door warns that worn pulleys are the number‑one cause of cable fraying and instructs homeowners to check for wobbling or worn bearings and replace them when installing new springs. The same article reminds DIYers to open the door fully and clamp it before working on pulleys to prevent the door from dropping.
Holmes’ manual provides further detail: the eyebolts holding the sheaves should be installed about 12 inches above the track to prevent the spring assembly from dragging, and the pulleys must be attached using the correct bolts.
How to inspect and replace pulleys
- Visual check: With the door open and clamped, inspect each pulley for rust, worn grooves, or side‑to‑side play. A pulley should spin smoothly without wobbling.
- Check cable condition: Look for frayed strands, flattened sections or kinks near the pulleys. A frayed cable indicates the pulley bearings may be failing and should be replaced.
- Replace in pairs: If one pulley shows significant wear, replace both on that side to maintain even operation. Pulley kits are inexpensive compared with the cost of repairing a snapped cable or bent track.
- Lubricate moving parts: Apply a light garage‑door lubricant (never grease) to the sheave bearings after installation to reduce friction.
- Inspect mounting hardware: Loose bolts or brackets can cause misalignment. Tighten all hardware securely and ensure that sheaves are properly aligned with the track and spring.
By paying attention to the condition of your pulleys and cables during a spring replacement, you can prevent future cable failures and extend the life of the entire system.
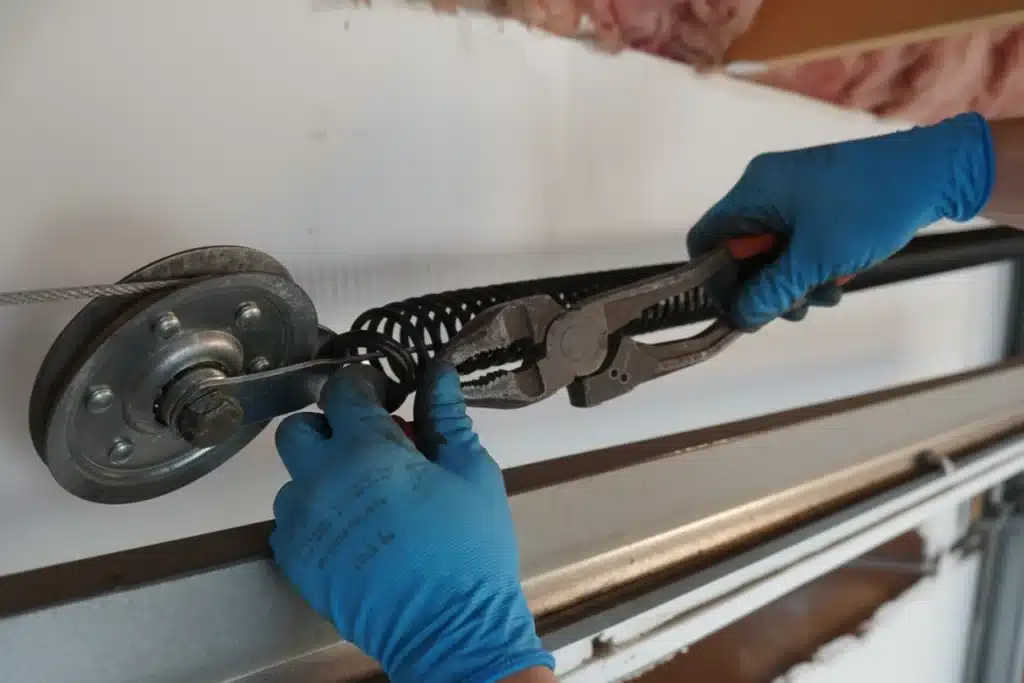
5 – Cable Synchronization (The S‑Hook Adjustment)

After replacing extension springs, the cables on both sides of the door must be synchronized so that the door lifts evenly. An uneven cable length causes the door to lift crookedly, which can make it bind in the tracks and strain the opener. Manufacturers provide specific methods for adjusting tension. The Holmes supplemental instructions outline the process: after attaching the springs and threading the cables, tie the cable to the three‑hole adjusting clip, hook it to the horizontal angle with an S‑hook and adjust the knot so that all spring tension is relieved and the cable holds the springs above the track.
To increase tension, move the S‑hook closer to the door opening; moving it farther away decreases tension. Both sides must be adjusted equally, and the manual stresses that the door must be clamped in the open position during adjustments.
Adjusting the S‑hook and cable length
- Secure the door: Raise the door fully and clamp it to release tension. Use two C‑clamps or locking pliers on the track just below the bottom rollers.
- Identify the three‑hole adjusting clip and S‑hook: The cable from each spring attaches to a clip with three holes and an S‑hook that connects to the track hanger. This setup allows fine adjustments.
- Relieve tension: Detach the cable from the S‑hook carefully. Do not let the spring snap; hold it firmly with both hands. Adjust the knot on the three‑hole clip so that the spring is slightly stretched but not under full tension. Holmes advises adjusting until the spring is supported above the track and tension is equal on both sides.
- Change hook position: Move the S‑hook to a different hole on the horizontal track angle. Moving the hook closer to the door increases spring tension, making the door lighter; moving it away reduces tension, making the door heavier. Make small changes—one hole at a time—then test the balance.
- Repeat on the other side: Set the S‑hook to the corresponding hole on the opposite track. It is crucial that both sides be adjusted evenly, otherwise the door will bind or tilt.
- Check cable routing: Ensure the cable runs smoothly over the stationary and movable sheaves without crossing over itself. Misrouted cables will wear prematurely and cause uneven tension.
- Reattach and secure: After adjustment, reattach the cable to the S‑hook, make sure the knot is secure and there is no slack where the cable could jump off a pulley.
After each adjustment, remove the clamps and lower the door manually to check balance (see Section 6). If the door still drifts or one side rises faster, repeat the process. Avoid large adjustments or twisting the spring; incremental changes are safer and more predictable.
6 – The Final Balance Test
Once the new springs are installed, the cables synchronized and all hardware tightened, a balance test ensures the door operates safely. Marko Door’s 2025 guide explains that a balanced garage door remains stationary when manually positioned halfway open. The same article notes that properly balanced doors reduce strain on opener motors and prevent sudden closures that can injure people. Their manual testing process involves several steps:
- Disable the opener: Pull the emergency release cord to disengage the motor so the door moves freely.
- Lift the door to waist height: Open the door fully, then lower it to about halfway (waist height) and release it. The door should stay in place. If it drifts up, the springs are too tight; if it drops, they are too loose.
- Record movement: Mark the positions where the door rises or falls and note the direction and magnitude. Repeat the test several times for consistency.
- Adjust tension as needed: If the door drifts up or down, return to Section 5 and adjust the S‑hook or spring position accordingly. For torsion springs, technicians use winding bars to add or remove quarter turns, but extension spring adjustments involve moving the S‑hooks or eyebolts as described by Holmes. After each adjustment, retest until the door remains level.
- Inspect for symmetry: During the test, verify that both sides of the door move together. If one side rises faster, adjust that side’s cable to equalize tension. Marko Door warns that uneven balance puts extra strain on the opener and can lead to premature wear.
What if the door won’t stay halfway?
If your door either slowly rises or drops when released, it means the springs and cables are not perfectly balanced. Slight drift up is acceptable; Marko Door notes that a small amount of upward or downward movement can occur, especially with belt‑drive openers, but the door should not slam shut or fly open. If the door cannot be balanced with adjustments to the S‑hooks or eyebolts, the springs may be the wrong size. In that case, call a professional to measure and replace the springs properly. Never operate a garage door that fails the balance test, as the opener will strain and could break.
Conclusion: Safety Over Savings
Replacing extension springs and adjusting cables are advanced tasks that require strict adherence to safety rules. Always begin with the Open-Door Rule: fully raise the door, secure it with clamps, and disconnect the opener. Use the standardized color-coding system to select the correct springs, install safety cables to prevent injury, and inspect pulleys for wear to avoid premature cable failure.
Fine-tune your system by adjusting the S-hooks incrementally, and always perform a Balance Test—a properly balanced door should stay stationary at waist height.
Need professional help? If you are unsure about your door’s weight or feel uncomfortable handling high-tension springs, it is safer to call an expert. You can find garage door repair services near you to ensure your system is handled with professional-grade tools and safety standards.