
If your garage door sensor light is yellow, you might be wondering what it means and how to fix it. Garage door sensors are a key safety feature, and a yellow light is their way of signaling you. Sometimes it’s perfectly normal – other times it’s a sign something needs attention. In this comprehensive guide, we’ll explain why that little yellow light is on, walk you through DIY-friendly troubleshooting steps, and cover fixes for common issues. We’ll also touch on popular brands like LiftMaster, Chamberlain, Genie, and Craftsman, so you know what to expect from each. By the end, you’ll know exactly what to do when the garage door sensor light is yellow and how to keep your garage door running safely and smoothly.
Why Your Garage Door Sensor Light Is Yellow ?
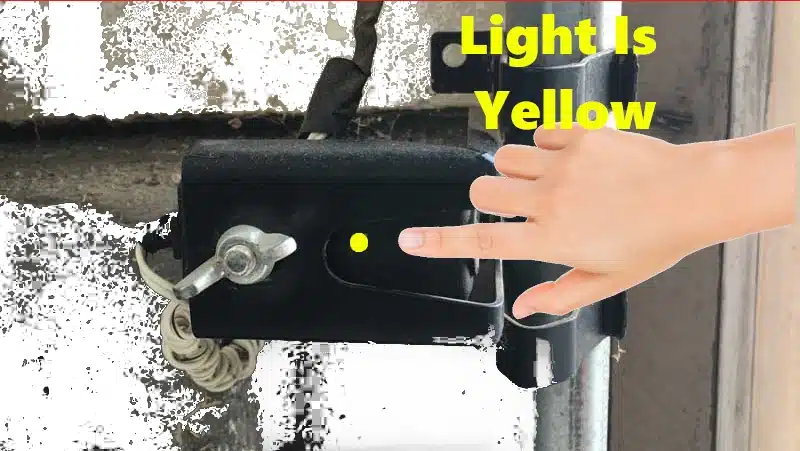
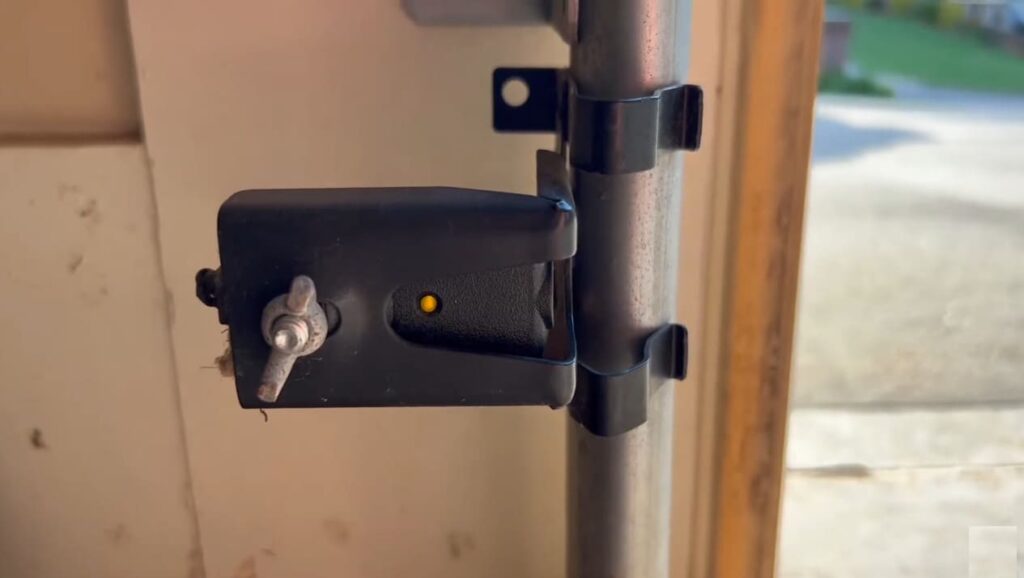
Garage door sensor lights communicate the status of your door’s photo-eye safety system. Typically, there are two sensors facing each other at the base of the garage door tracks – one on each side. In many systems (such as LiftMaster, Chamberlain, and Craftsman openers), one sensor emits the infrared beam (the “sending” sensor) and the other receives it (the “receiving” sensor). These sensors often have two different colored LED lights: one side shows yellow (or amber) and the other shows green.
The yellow light is usually on the sending sensor and acts as a power indicator – it glows steady to tell you that the sensor is powered and sending the infrared beam. The green light on the opposite sensor means the beam is being received and the sensors are aligned properly.
Seeing one yellow and one green sensor light is normal in many garage door systems. It indicates the sensors have power and are working: the yellow (sending) side is on, and the green (receiving) side confirms alignment. In this case, your garage door should operate safely. However, if your garage door won’t close or the sensor lights are behaving oddly (for example, the green light is off or the yellow light is flashing), the yellow light may be signaling a problem. A steady or flashing yellow sensor light can mean different things depending on the scenario:
- Yellow Light Only (Green Off): If the sending sensor shows yellow but the receiving sensor’s green light is off, it suggests the beam isn’t reaching the other side. This could be due to misalignment or an obstruction in the sensor’s path. Essentially, the yellow side has power, but the green side can’t “see” it.
- Yellow Light Flashing: A blinking or flickering yellow light (on systems where the yellow can blink) often points to a problem like misalignment, wiring issues, or interference. Some models may flash to get your attention.
- Yellow Light Off Entirely: If the yellow light isn’t lit at all, that sending sensor likely isn’t powered or functioning. It could be a power/wiring issue or a faulty sensor, which means the safety beam isn’t being sent. In this case the door might not close because the system thinks something’s wrong (for safety, it stops the door).
In short, the yellow sensor light is there to communicate status. A constant yellow + green usually means things are okay, while changes (off or blinking) mean something needs checking. Next, we’ll go over the common reasons behind a yellow light issue and how to fix them.
Common Causes When Your Garage Door Sensor Light Is Yellow (and How to Fix Them)
A yellow sensor light can be triggered by a few common issues. Here are the likely causes and their DIY fixes:
- Sensor Misalignment: One of the most frequent causes is the two sensors not pointing directly at each other. If they get nudged or loose, the infrared beam gets misaligned. In many systems the yellow light might stay on but the green goes out, indicating the alignment is lost. Fix: Gently adjust the sensors so they face each other straight on. Loosen the wing nut on the sensor bracket and reposition the sensor until the green light comes back on steadily. Tighten it once aligned. Even a small tweak can realign the beam and turn that green light steady again. This often solves the problem immediately if misalignment was the issue.
- Obstruction or Debris: A blockage can also cause sensor issues. Something as simple as a cobweb, leaves, or a trash bin placed near the sensor can partially break the beam. The yellow light might appear steady or flicker, and the door may refuse to close because it “thinks” something is in the way. Fix: Inspect the area around the sensors. Remove any object or debris in front of the lenses. Even dirt or spider webs on the sensor eye can act like an obstruction. Clearing the sensor’s line of sight often restores normal operation. For example, if a garden tool fell against the sensor or dust accumulated on it, simply clearing it could turn that stubborn yellow indicator back to normal.
- Dirty Sensor Lenses: Dust, dirt, or grime on the sensor’s eyes can mimic an obstruction by blocking the infrared beam. Over time, garage sensors collect dirt (especially in dusty garages or if you’ve been doing projects). This might not fully extinguish the yellow light, but it can weaken the beam enough to cause intermittent problems. Fix: Give the sensor lenses a gentle cleaning. Use a soft dry cloth (or a mild cleaner if needed) to wipe the sensor eyes clean. Make sure both the emitting and receiving sides are free of smudges. This simple cleaning can improve the beam’s strength. (Tip: doing this periodically is a good preventative practice, as noted by experts.)
- Wiring or Power Issues: Sometimes the sensor itself is fine, but the wiring supplying power to it is loose or damaged. If a wire connection is shaken loose (for instance, by vibrations or a bump) or if rodents have chewed a wire, the sensor may lose power intermittently. A yellow light might flicker if power is unstable, or go off if power is lost. Fix: Examine the thin wires leading to each sensor. Ensure they are firmly connected at the sensor and at the opener unit. Look for any obvious breaks or chew marks in the insulation. If you find a loose wire, reattach or tighten it (make sure to turn off the power to the garage door opener first for safety). Minor wiring issues can often be fixed with a screwdriver or by twisting wires back together with a wire connector. If wires are damaged, you may need to splice in a new section or call a professional for more complex repairs.
- Sunlight Interference: A less obvious cause is direct sunlight hitting the sensor eyes. Bright sunlight can overwhelm the infrared sensor (especially the receiver) with IR light, similar to how it works, causing the system to think the beam is interrupted. This tends to happen at certain times of day when the sun’s angle is low and shining into the garage. You might notice the door fails to close in the afternoon but works at night – a clue that sunlight is the culprit. Fix: If you suspect this, try to shade the sensors and see if the lights return to normal. One solution (from Genie’s guidelines) is to position the sensors such that the receiving sensor (often green LED) is on the side of the door away from direct sun. You can also fashion a small shade or tube (even a paper towel tube or a piece of cardboard) around the sensor to block sunlight. Just ensure not to block the sensor lens itself. Newer sensors are less prone to sun interference, so if it’s a recurring problem, consider upgrading to newer photo-eye sensors that have sun shields.
- Faulty Sensor or Component: Finally, it’s possible the sensor unit itself has failed or another component (like the garage door opener’s logic board) is at fault. This is less common, but if a sensor’s internal electronics are bad, the yellow light may not come on at all (no power) or never turn off, and no amount of aligning or cleaning will fix it. Fix: To diagnose, you might swap the sensors (left to right) to see if the problem follows a sensor. Replacing a sensor pair is relatively inexpensive. If it’s a logic board issue (especially if no sensor lights come on at all), you’ll likely need a professional repair or replacement of the opener. Always consult your garage door opener’s manual for specific diagnostic codes or indications; some openers will flash the main unit lights in patterns to signal sensor problems.
By identifying the cause from the list above, you can apply the right fix. Next, we’ll go through a step-by-step troubleshooting process you can follow to get your garage door sensors working again.
Sensor Light Differences for LiftMaster, Chamberlain, Genie, and Craftsman
Garage door sensor indicators can vary by brand, so it’s helpful to know how yours works – especially when troubleshooting a yellow light. Here’s a quick rundown of how popular brands use colored lights on their sensors:
- LiftMaster/Chamberlain/Craftsman: These three brands are actually very closely related – Chamberlain Group manufactures LiftMaster (typically professional line) and Craftsman (Sears) openers, among others. Their sensors generally follow the same color pattern: one sensor has a yellow (amber) LED, and the other has a green LED. The amber/yellow LED is on the sending sensor, which means it’s the transmitter that sends the beam. This light should be steady on, indicating the sensor is powered and sending the infrared beam. The green LED is on the receiving sensor and it lights up when it successfully receives the beam and is aligned properly. In fact, for Chamberlain/LiftMaster/Craftsman sensors, the receiving eye should always show green when things are working. So if you have one of these brands and your garage door sensor light is yellow on one side, that’s expected – it shows power is on. But if the green side is not lit, then the beam isn’t connecting. In summary: Yellow + Green = normal operation; Yellow (only) with green off = something’s blocking or misaligned (or the green sensor isn’t working). Aligning the sensors or clearing obstructions should get the green light back on. If the yellow light is off on a Chamberlain/LiftMaster unit, that means the sending sensor has no power, which could be a wiring issue or bad sensor.
- Genie: Genie garage door openers handle things a bit differently. Genie Safe-T-Beam sensors typically use red LEDs on both sensors, rather than a yellow/green combo. One sensor’s LED will glow solid red to show power (and beam transmission), and the other should also show solid red when aligned and receiving. If you see a flashing red light on a Genie sensor, it indicates a problem – usually an obstruction or misalignment (Genie sensors blink a certain number of times to diagnose issues). For example, a Genie sensor blinking 3 times often points to sunlight interference or a similar issue. Important: If you own a Genie opener, you won’t actually have a yellow light at all – so a query about “sensor light is yellow” wouldn’t apply in the same way. Genie owners should interpret their sensor lights according to Genie’s red/green system (typically one red, one green on newer Genie models; or both red on older models). Always consult your Genie manual for the blink codes, but generally solid red = good, blinking red = adjustment needed.
- Other Brands: Most other major brands resemble one of the above schemes. Overhead Door (the parent company of Genie) often uses similar sensors to Genie. Marantec and Guardian are examples with their own twists: Guardian sensors have one green (transmitter) and one red (receiver), and Marantec sensors have a green transmitter and red receiver indicator. Many brands call their amber light “yellow” and use it the same way as Chamberlain/LiftMaster do. The key is to remember that one sensor’s LED signifies power is present, and the other signifies the alignment/connection. Check your specific opener’s manual if you’re unsure which color is which on your model. The manual will also explain any blinking patterns or unique behaviors (for instance, some systems flash the main opener light or display an error code if sensors are not right).
No matter the brand, the troubleshooting concepts are very similar. A sensor light that’s illuminated in the proper color for that brand means it has power, and the opposite sensor should confirm alignment. Any deviation (flashing, off-color, or off completely) usually points to the same set of issues: misalignment, obstruction, dirt, or wiring problems. Now, let’s cover a few extra tips on inspecting your sensors safely and effectively – including a handy use for your smartphone camera.
What a Yellow Sensor Light Means and How to Solve It ?
In conclusion, when your garage door sensor light is yellow, it’s essentially the system’s way of grabbing your attention. In many garage door models, the yellow (or amber) light is a normal power indicator on the sending sensor. On its own, a solid yellow light typically means that sensor has power and is working electrically. However, that yellow light becomes a concern if your door isn’t closing or if the accompanying green light is off.
A yellow sensor light accompanied by a non-working door usually indicates one of a few issues that we’ve discussed: misaligned sensors, something blocking the beam, dirty sensor lenses, or a wiring/power problem. The good news is that these issues are usually easy to diagnose and fix with basic household tools and a bit of patience.

My garage door opener, Craftsman is working ok , however, my monitor in the house is steady blinking RED and GREEN, either garage door is closed or open. What could be a problem? Please advice .